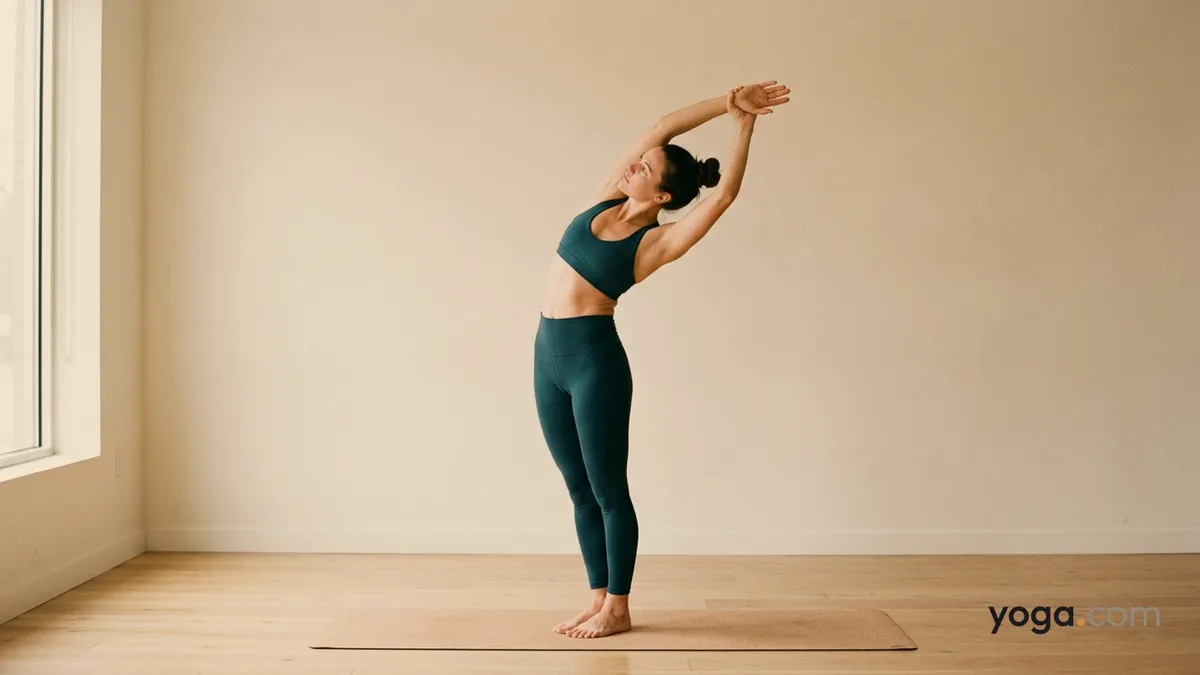
Pārśvāsana — from the Sanskrit pārśva (side) — is a standing lateral bend that lengthens the entire right side of the body. In this wrist-grab variation, your left hand clasps the right wrist, creating gentle traction through the right arm and deepening the stretch along the right lateral line from hip to fingertips.
At a Glance
Level: BeginnerType: StandingTargets: Right lateral trunk (obliques, intercostals, quadratus lumborum), right shoulder and upper arm, left hip abductors (stabilizing)Good for: Building lateral spinal mobility, lengthening the side body, improving upright postural awarenessHow to Do Wrist Grab Left Bend
Stand in Mountain Pose — feet hip-width apart, weight even across both soles, arms at your sides.On an inhale, sweep both arms overhead, palms facing each other. Lengthen your spine upward before you move into the bend.With your left hand, reach across and wrap your fingers around your right wrist.Ground through both feet equally. Press firmly into the outer edge of the left foot, which will want to lift as you bend.Exhale and draw the right arm — guided by the left hand — in a long arc to the left, initiating the movement from your waist rather than collapsing at the shoulder.Resist letting the right hip push out to the right; keep both hip points drawing toward each other so the pelvis stays neutral and the stretch stays in the side body.Keep the right ear in line with the right upper arm. Let your gaze travel toward the ceiling or, if comfortable for your neck, slightly upward and to the left.Hold for 5–8 full breaths, using each inhale to create more length through the right side and each exhale to deepen the arc gently.To come out: On an inhale, engage your core lightly and use the left hand to guide the arms back to center overhead. Release the grip, lower both arms on the exhale, and return to Mountain Pose.Benefits
Lengthens the right lateral trunk. The obliques, intercostals, and quadratus lumborum on the right side move through their full range of motion, supporting lateral spinal mobility.Tractions the right shoulder and arm. The left hand's grip gently decompresses the right shoulder joint and elongates the muscles of the right upper arm and forearm.Strengthens the left hip stabilizers. Keeping the pelvis level while bending left activates the left gluteus medius and hip abductors isometrically.Promotes rib cage expansion. The lateral position opens the intercostal spaces on the right, giving the right lung room to expand with each inhale.Builds postural body awareness. Maintaining a two-dimensional, flat bend — rather than rotating forward — trains the nervous system to differentiate lateral from rotational movement.Common Mistakes and Alignment Cues
Mistake: The right hip juts out to the right. Cue: Before you bend, draw both hip points lightly toward each other. Keep that engagement throughout — the pelvis should stay stacked, not sliding sideways.Mistake: The torso rotates forward, turning the bend into a twist. Cue: Imagine your front body and back body pressed between two panes of glass. Both shoulders stay in the same plane as the hips.Mistake: The left foot lifts or rolls inward. Cue: Press the outer edge of the left foot firmly into the floor. Rooting both feet equally is what creates the lever that makes the stretch effective.Mistake: The neck cranes upward, compressing the cervical spine. Cue: Keep the right ear close to the right upper arm. The head is an extension of the spine — let it follow the arc, not lead it.Mistake: The bend happens only at the shoulder, not the waist. Cue: Initiate the movement by sliding your right ribs away from your right hip. The arms follow the torso, they don't pull it.Modifications and Props
Tight shoulders or limited overhead range: Instead of clasping the right wrist, simply rest the left hand on the right forearm or interlace the fingers loosely. Focus on the lateral bend rather than the grip.Difficulty keeping the pelvis stable: Stand with your back heel touching a wall. The wall gives immediate feedback if the right hip drifts back or out.Balance challenge: Widen your stance slightly — up to hip distance plus a few inches — and soften the knees marginally to lower your center of gravity.Deeper traction: Once alignment is solid, wrap the left hand more firmly around the right wrist and breathe into the right ribcage to amplify the stretch from the inside out.Cautions
Move slowly if you have any current neck discomfort; keep the gaze straight ahead rather than tilting the head.Avoid forcing the bend if you feel pinching or sharp sensation along the left (compressed) side — that is a signal to reduce the range.Those with recent shoulder, wrist, or lateral rib injuries should keep the arms lower or practice without the overhead reach until comfortable.If you're working with an injury or a medical condition, check with a qualified professional before practicing.Related Poses
Mountain Pose — the starting and finishing position; reinforces the neutral alignment you carry into the bend.Mountain Pose with Upward Stretch — builds the overhead arm position and shoulder mobility needed before adding the lateral arc.Right Triangle Pose — extends lateral-line lengthening into a wide-leg stance, the natural progression once the side body is more open.Warrior Pose with Right Leg Bent — develops the hip stability and grounded lower body that supports confident standing side bends.