Wide Legged Forward Bend — Prasārita Pādottānāsana, from the Sanskrit prasārita (spread out), pāda (foot), ut (intense), tāna (stretch), and āsana (pose) — is a standing forward fold performed with the feet set wide apart. It offers many of the same lengthening effects as Standing Forward Bend while placing less demand on hamstring flexibility, making it an accessible choice for beginners. You'll find it in standing sequences, as a transition between warrior poses, or as a quieting pose toward the end of a practice.
At a Glance
Level: BeginnerType: Forward BendTargets: Hamstrings, inner thighs (adductors), spine, hip flexorsGood for: Building spinal length, improving hip mobility, developing body awareness in a stable baseHow to Do Wide Legged Forward Bend
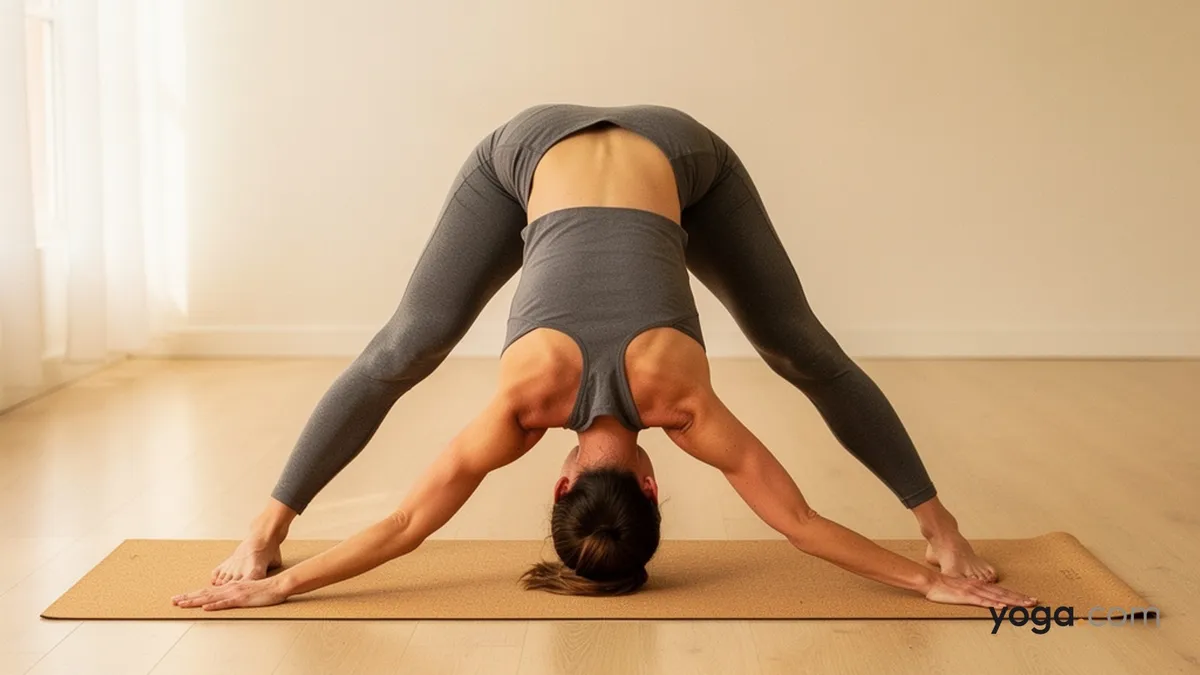
Stand at the center of your mat with your hands on your hips. Step your feet wide — roughly three to four feet apart — with the outer edges of your feet parallel to the short edges of your mat and toes pointing forward.Press all four corners of each foot firmly into the floor. Draw your inner thighs upward and engage your quadriceps to protect your knee joints.On an inhale, lengthen your spine tall, lifting the crown of your head toward the ceiling and broadening across your collarbones.On an exhale, hinge forward from your hip creases — not your waist — keeping your back long as you fold. Place your fingertips or palms on the floor directly under your shoulders, shoulder-width apart.On your next inhale, extend your spine forward into a half-lift: arms straight, chest lifted, gaze slightly ahead. Pause here for a breath to establish length before folding deeper.Exhale and walk your hands back between your feet, bending your elbows directly backward (not out to the sides) as you lower the crown of your head toward the floor. Rest the top of your head on the mat if it reaches comfortably.Hold for five to ten breaths. With each inhale, create space in the spine; with each exhale, allow gravity to deepen the fold gently.To come out, place your hands back under your shoulders, straighten your arms, and on an inhale press through your feet to rise with a long spine. Return your hands to your hips and step your feet back together.Benefits
Stretches the hamstrings and inner thigh muscles through a wide, symmetrical range of motionLengthens the lumbar spine and decompresses the vertebrae when the head hangs freelyStrengthens the arches of the feet and the muscles along the inner legs as they resist the wide stanceBuilds awareness of hip-hinge mechanics — folding from the hip creases rather than rounding from the lower backGently tones the abdominal muscles as they support the torso during the foldCommon Mistakes and Alignment Cues
Rounding from the lower back instead of hinging at the hips. Before you fold, place your hands on your hip creases and physically press them back and up as you hinge forward — this cues the correct movement pattern.Feet too close together, reducing stability. Your stance should be wide enough that your torso can fold with a long spine.Elbows flaring out to the sides. Keep your elbows tracking straight back, in line with your wrists — this maintains shoulder integrity and allows a fuller spinal release.Collapsing the inner arches. Press the big-toe mounds and inner heels down firmly, and lift the inner ankles to maintain the arches throughout the pose.Holding the breath at the deepest point. Breathe steadily; a smooth exhale allows the muscles to soften, while gripping the breath creates unnecessary tension in the neck and shoulders.Modifications and Props
Blocks under the hands: If your hands don't reach the floor without rounding your back, place two blocks at their highest height under your palms. As your hamstrings lengthen over time, lower the blocks progressively.Hands on the shins: Keep your hands on your shins and maintain a flat-back half-fold. This builds the hip-hinge pattern and spinal length before you attempt the full fold.Chair support: Place a chair in front of you and rest your hands on the seat. This option works well if you have limited hamstring flexibility or balance concerns.Head supported on a block: If your head doesn't reach the floor, place a block beneath your crown for support so you can fully release the neck without straining.Cautions
Lower back sensitivity: If you feel compression or sharp discomfort in the lumbar spine, keep your knees softly bent and prioritize a long back over a deeper fold.Hamstring injury: Avoid pulling aggressively into the stretch; fold only as far as you can while keeping the back flat and the pelvis moving freely.High blood pressure or head-down inversions: Come out of the pose slowly and pause in the half-lift before rising fully to avoid dizziness.Knee discomfort: Keep a microbend in the knees and ensure they track over the second toes rather than collapsing inward.If you're working with an injury or a medical condition, check with a qualified professional before practicing.
Related Poses
Standing Forward Bend — a preparation pose that teaches the hip-hinge mechanics used here with a narrower stanceWide-Angle Seated Forward Bend — the seated counterpart, offering a similar adductor and hamstring stretch from the floorDownward-Facing Dog Pose — a complementary pose that continues the work of lengthening the hamstrings and spineSeated Forward Bend — a natural progression for deepening hamstring flexibility after the wide-legged versionFor sequences where this pose fits well, see A Gentle Yoga Routine for Tired, Low-Energy Days and A 10-Move Chair Yoga Sequence for a Midday Reset.