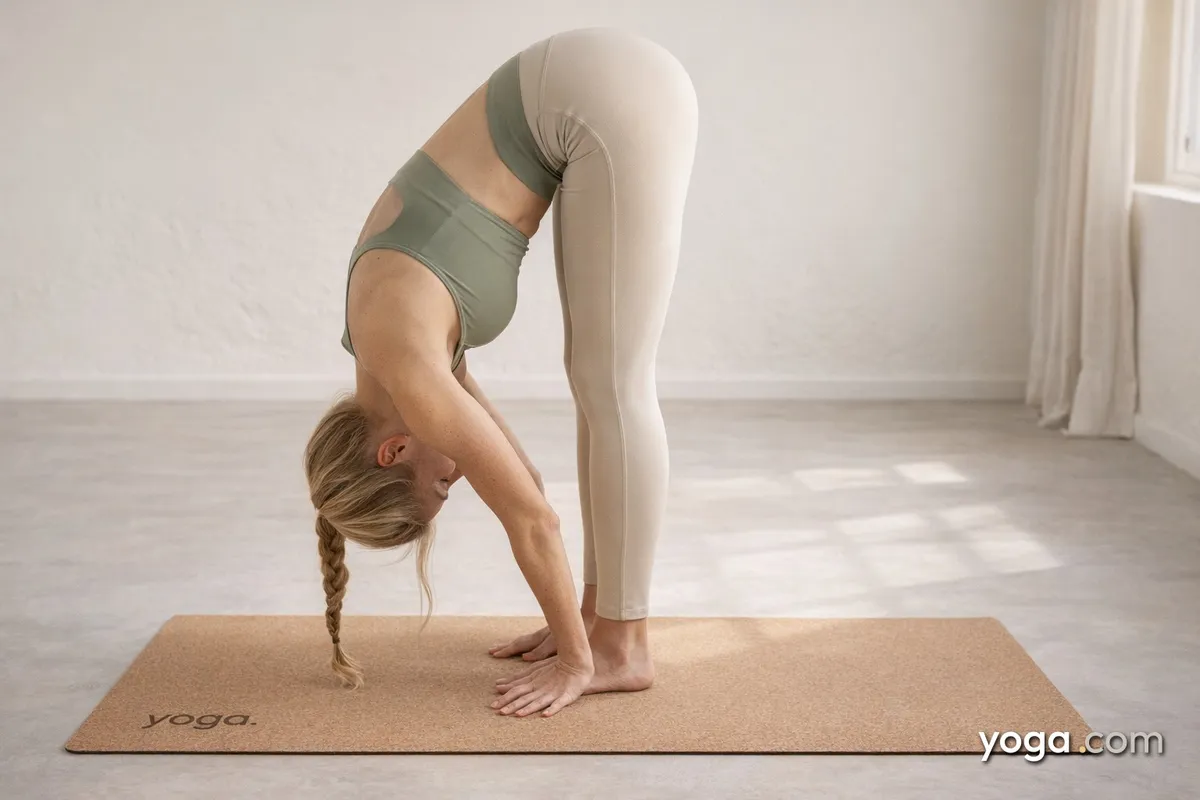
Standing Forward Bend, or Uttānāsana (oot-tan-AHS-uh-nuh) - from the Sanskrit ut (intense), tān (stretch), and āsana (pose) - is a full-length stretch of the entire back body performed from a standing position. It appears throughout practice as a transition between standing poses, a moment of reset between sequences, and a pose in its own right. Accessible to most beginners yet endlessly refinable, it rewards consistent attention.
At a Glance
- Level: Beginner
- Type: Forward Bend
- Targets: Hamstrings, lumbar spine, calves, hip flexors
- Good for: Lengthening the posterior chain, calming the nervous system, improving hip-hinge mechanics
How to Do Standing Forward Bend
- Begin in Mountain Pose (Tāḍāsana) with your feet hip-width apart, outer edges of the feet parallel. Root evenly through all four corners of each foot.
- Inhale to lengthen your spine, drawing the crown of the head up and broadening across the collarbones.
- Exhale and hinge forward at your hips - not your waist - leading with your chest and keeping a long spine as you begin the descent. Place your hands on your thighs, shins, or the floor to manage the movement.
- Once you've gone as far as your hamstrings allow with a long spine, let the spine round naturally and release your torso toward your thighs. Allow the crown of the head to hang heavy toward the floor.
- Place your fingertips or palms on the mat (or on blocks), framing your feet. Engage your quadriceps gently to encourage the hamstrings to lengthen.
- With each inhale, create a small amount of length through the spine; with each exhale, allow the torso to soften a little closer to the legs. Keep the weight slightly forward over the balls of your feet.
- Hold for 5-10 breaths, gaze softly toward your shins or let it rest at your knees.
- To come out, bend your knees generously, place your hands on your hips, press firmly through your feet, and rise on an inhale with a flat back - or simply roll up slowly through the spine, stacking one vertebra at a time.
Benefits
- Stretches the hamstrings, calves, and the full length of the spine.
- Strengthens the quadriceps as they isometrically contract to support the pose.
- Increases range of motion at the hip joint over time.
- Decompresses the lumbar vertebrae when the spine hangs freely.
- Trains the hip-hinge movement pattern that underlies many other standing and seated forward bends.
- Brings the head below the heart, encouraging a shift toward parasympathetic tone.
Common Mistakes and Alignment Cues
- Rounding from the waist immediately: Initiate the fold from the hip crease, not the lower back. Think of the pelvis tipping forward over the heads of the femurs before the spine rounds.
- Locking the knees: Keep a micro-bend in the knees, especially if your hamstrings are tight, to protect the joint and allow the pelvis to tilt more freely.
- Weight falling back into the heels: Shift your weight slightly forward so your hip points stack over your anklebones - this is the position where the stretch is most effective.
- Gripping the neck: Let the head hang completely. Release any tension in the jaw, throat, and back of the neck; the cervical spine is part of the fold too.
- Holding the breath: Maintain a steady, even breath throughout. The exhale is your cue to soften further; the inhale is your cue to find length.
Modifications and Props
- Yoga blocks under the hands: If the floor feels far away, place two blocks at their highest height on either side of your feet. This keeps the spine long and the hip hinge honest.
- Bent knees: Generously bending the knees allows the abdomen to rest on the thighs, releasing the lower back. Gradually work toward straightening as the hamstrings open over weeks of practice.
- Hands clasped behind the back: Interlace the fingers behind your back before folding, then let the arms arc overhead as you descend. This adds a chest and shoulder opener to the pose.
- Wall support: Stand with your back heels a few inches from a wall and gently press the sitting bones back into the wall as you fold. This gives tactile feedback for shifting weight forward and keeping the pelvis in the right position.
Cautions
- Low back injury or disc issues: Avoid deep spinal rounding; keep a slight bend in the knees and focus on hinging from the hips rather than collapsing through the lumbar spine.
- Hamstring strain or tear: Back off well before any sensation of pulling at the sit bones; prioritize a long spine over depth of fold.
- High blood pressure or glaucoma: Use caution with the head below the heart for extended holds; come up slowly to avoid dizziness.
- Osteoporosis: Avoid deep forward rounding of the thoracic spine; use blocks and keep the spine as neutral as possible.
If you're working with an injury or a medical condition, check with a qualified professional before practicing.
Related Poses
- Mountain Pose - the natural starting and ending point for this pose; establishes the alignment you carry into the fold.
- Both Big Toes Pose - a close variation that adds a grip of the big toes to deepen hamstring engagement.
- Seated Forward Bend - the supine counterpart that teaches the same posterior-chain stretch with gravity removed from the equation.
- Downward-Facing Dog Pose - a complementary pose for the posterior chain and a common transition into and out of Standing Forward Bend in Sun Salutations.
See also: A Gentle Yoga Routine for Tired, Low-Energy Days and A 10-Move Chair Yoga Sequence for a Midday Reset.