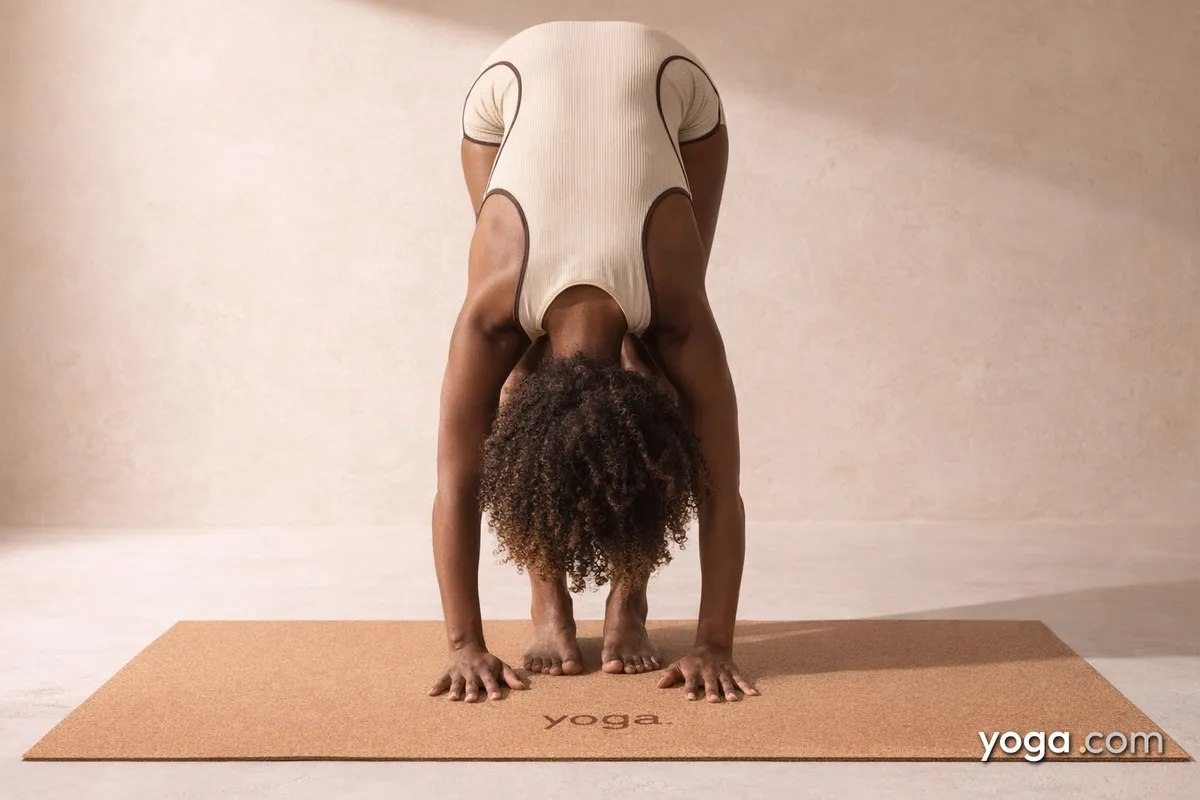
Standing Forward Bend with Hands on the Floor is a full standing forward fold in which both palms rest flat on the ground beside your feet, deepening the hip flexion and lengthening the entire posterior chain. Its Sanskrit name, Uttānāsana (hands on floor), translates roughly as "intense stretch" (ut = intense, tān = stretch, āsana = pose), reflecting the strong demand placed on the back body. It appears regularly as a transition between standing sequences and as a grounding pose in its own right.
At a Glance
- Level: Beginner
- Type: Forward Bend
- Targets: Hamstrings, lumbar spine, calves, hip flexors
- Good for: Lengthening the posterior chain, building hip-flexion range of motion, calming the nervous system through inversion of the head
How to Do Standing Forward Bend with Hands on the Floor
- Begin in Mountain Pose (Tadasana) with your feet hip-distance apart and parallel, weight evenly distributed across all four corners of each foot.
- On an inhale, lengthen tall through the crown of your head and draw your shoulders back and down.
- On your exhale, hinge forward from the hip creases - not the waist - keeping your spine long as you begin to lower your torso toward your thighs.
- Allow a soft bend in your knees as needed so that both palms can reach the floor, fingertips aligned with the toes or slightly forward. The goal is flat hands on the ground, not straight legs at any cost.
- Once your hands are grounded, press them evenly into the floor, broaden across your upper back, and let your head hang heavy. Your gaze is toward your shins or the floor.
- With each inhale, create a little more length along the front of the torso; with each exhale, allow the fold to deepen naturally. If your hamstrings permit, begin to straighten the legs without locking the knees - draw the kneecaps up by engaging the quadriceps.
- Hold for 5-10 breaths, keeping the weight slightly forward over the balls of your feet so your hips stack over your ankles.
- To come out, bend your knees generously, place your hands on your hips, and on an inhale press down through your feet as you slowly lift your torso back to upright. Roll up through the spine one vertebra at a time, bringing your head up last.
Benefits
- Stretches the hamstrings, calves, and the entire length of the spine.
- Strengthens the quadriceps as they work to draw the kneecaps up and stabilize the straight leg.
- Lengthens the muscles of the lower back and sacral region.
- Encourages hip-flexor mobility by training deep, repeated hip-hinge mechanics.
- Inverts the head below the heart, increasing circulation to the upper body and promoting a quieter breath rhythm.
- Builds proprioceptive awareness of pelvic tilt - the distinction between hinging at the hips versus rounding through the lumbar - which carries over into most other forward bends.
Common Mistakes and Alignment Cues
- Rounding excessively from the waist instead of hinging at the hips. Cue: Place your hands on your thighs, find the crease at the top of each hip, and lead the fold from there rather than collapsing the mid-back first.
- Hyperextending the knees. Cue: Keep a micro-bend in the joints at all times; engage the quads to lift the kneecaps actively rather than locking the leg straight back.
- Weight shifting back onto the heels. Cue: Lean forward until you feel mild pressure at the balls of your feet - this keeps the hips aligned over the ankles and maintains the stretch through the calves.
- Straining the neck by lifting the chin to look forward. Cue: Let your head hang completely. Your gaze should drop toward the mat; there is no need to look ahead.
- Forcing the hands flat before the hamstrings are ready. Cue: Bend your knees enough that the palms land without strain; once grounded, work toward straightening the legs gradually over multiple breaths.
Modifications and Props
- Yoga blocks: If your palms do not reach the floor, place a block under each hand at whatever height allows you to keep your spine long. Lower the blocks over time as your range of motion increases.
- Bent-knee variation: Keep a generous bend in both knees throughout the entire hold. This removes hamstring tension from the equation and lets you focus on the hip-hinge and spinal length.
- Wall support: Stand with your heels a few inches from a wall and let your sitting bones rest lightly against it. The wall provides feedback that your hips are moving backward and upward as you fold, countering the tendency to shift weight into the heels.
- Hands-to-shins variation: If blocks feel unstable, rest your fingertips or palms on your shins. This is a stepping stone toward full hands-on-floor as hip and hamstring mobility develops.
Cautions
- Hamstring or lower-back strain: Keep a generous bend in the knees and prioritize a long spine over depth of fold. Avoid any sensation of sharp pulling behind the knees.
- Disk injuries or sciatica: A neutral-spine version with bent knees is generally safer than a deep rounded fold; move slowly and stop if symptoms increase.
- High blood pressure, glaucoma, or detached retina: Inversions that bring the head below the heart warrant extra care; transition in and out slowly and avoid holding the pose for extended periods.
- Pregnancy (second and third trimester): Widen the feet to create space for the belly and keep the knees soft throughout; avoid compressing the abdomen.
If you're working with an injury or a medical condition, check with a qualified professional before practicing.
Related Poses
- Mountain Pose - the natural starting point before entering the fold
- Standing Forward Bend - the parent pose, with hands holding elbows or reaching freely
- Downward-Facing Dog Pose - a closely related hamstring and calf stretch that also builds shoulder stability
- Seated Forward Bend - the seated counterpart for exploring the same posterior-chain length from a stable base
See this pose in context: A Gentle Yoga Routine for Tired, Low-Energy Days and A 10-Move Chair Yoga Sequence for a Midday Reset.