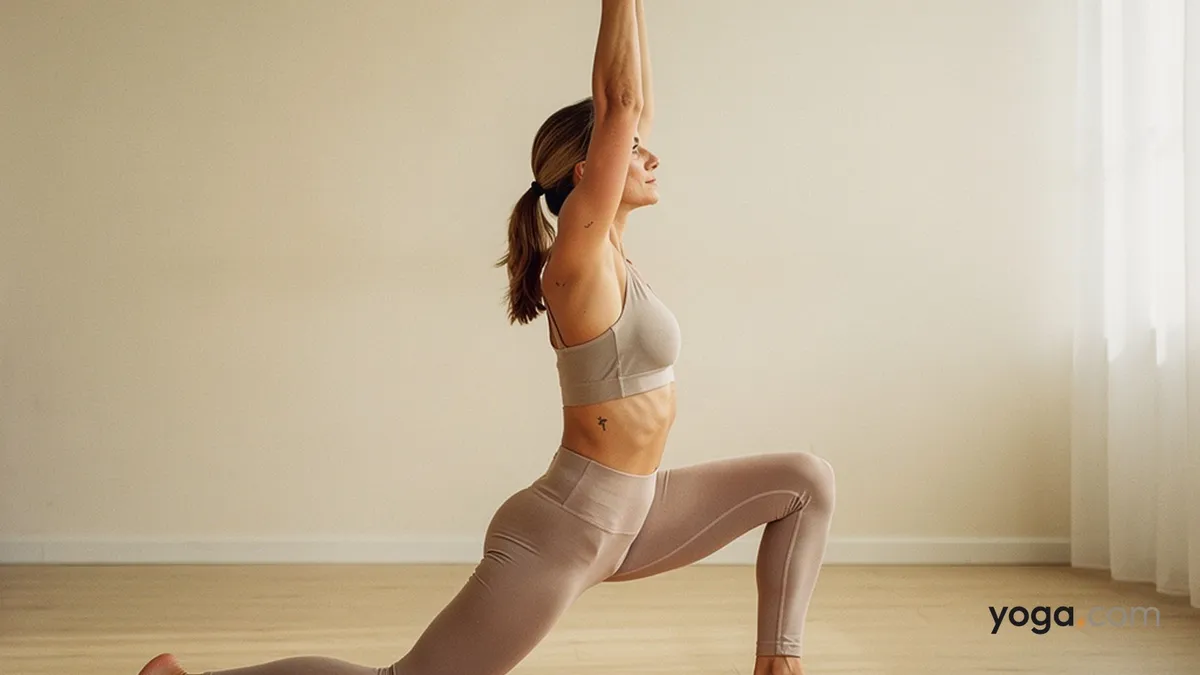
Low Lunge is a foundational kneeling pose that opens the front of the hip and lengthens the hip flexors of the back (left) leg. Known in Sanskrit as Añjaneyāsana (right leg forward) — named for Anjaneya, another name for the deity Hanuman, suggesting a deep, devoted bow — this version places the right foot forward and the left knee down. It appears early in beginners' sequences, in sun salutation variations, and as a preparatory shape before deeper backbends and standing poses.
At a Glance
Level: BeginnerType: KneelingTargets: Hip flexors (left psoas and iliacus), right hip and glutes, quadriceps, coreGood for: Building lower-body strength, improving hip extension range of motion, lengthening the front thigh of the back legHow to Do Low Lunge with Right Leg Forward
Begin on all fours in Table Pose, with your wrists under your shoulders and knees under your hips. Place a folded blanket under your left knee if the floor feels hard.Step your right foot forward between your hands, placing it flat on the mat so the right knee stacks directly over the right ankle. If your foot doesn't reach, use your hand to guide it forward.Lower your left knee to the mat and slide the left leg back until you feel a comfortable stretch along the front of the left thigh and hip. The top of your left foot rests on the mat.Press through the ball of the right foot and lift your torso upright, sweeping both arms overhead with palms facing each other. Draw your lower ribs in slightly to avoid overarching the lower back.Lengthen your tailbone toward the floor and gently engage your left glute to deepen the stretch at the front of the left hip. Keep your hips level — resist letting the left hip drop or flare out.Soften your shoulders away from your ears and gaze forward or slightly upward, keeping the back of your neck long.Hold for 5–8 breaths, maintaining even pressure through the right foot and a steady, lifted chest.To come out, lower your hands to the mat on either side of your right foot, tuck your left toes under, and step back to Table Pose or Downward-Facing Dog. Repeat on the left side when you are ready.Benefits
Stretches the left hip flexors (psoas and iliacus) through a full range of hip extension.Strengthens the right quadriceps, glutes, and hip stabilizers under load.Lengthens the left quadriceps and rectus femoris when the back shin is grounded.Builds stability in the core by challenging the pelvis to remain neutral against hip-flexor pull.Develops ankle dorsiflexion and proprioception in the right foot.Prepares the spine and hips for deeper backbending and standing postures.Common Mistakes and Alignment Cues
Right knee traveling past the ankle: Check that your shin is vertical. If the knee drifts forward, slide your right foot further ahead until the knee is directly over the heel.Hips uneven (left hip dropping lower or rotating open): Draw both hip points forward and level. Think of pressing the left hip crease gently toward the ceiling.Overarching the lower back to lift the arms: Engage your abdominals lightly and draw the front lower ribs toward the pelvis before you sweep the arms up. Length in the spine matters more than height in the arms.Tension in the neck and shoulders: If the shoulders creep up, rotate the outer arms back and let the shoulder blades slide down the back. Reach through the fingertips rather than gripping.Back toes tucked under instead of the top of the foot resting flat: Release the toes so the full top of the left foot is on the mat — this allows the quadriceps to lengthen more fully.Modifications and Props
Sensitive left knee: Fold a blanket or use a yoga mat double-layer under the back knee for cushioning.Balance challenge: Keep your hands on your right thigh (fingertips resting lightly) rather than raising the arms overhead. This lowers the center of gravity and lets you focus on hip alignment.Limited hip flexor length: Place yoga blocks under both hands at the highest height and keep the torso angled forward. Gradually work toward upright as flexibility develops.Arm variation: Bring your hands to prayer at the chest (Añjali Mudrā) as a midpoint between hands-on-thigh and arms-overhead — useful if the full overhead reach creates lower-back compression.Cautions
Knee discomfort: If you feel sharp pain in the right or left knee, come out of the pose and check your alignment. Avoid forcing the knee beyond the ankle.Hip or groin strain: Move into the lunge gradually. If you feel pinching in the front of the right hip, shorten the stance slightly.Lower back sensitivity: Keep the core gently engaged and avoid excessive lumbar extension. The hands-on-thigh variation is safer if lifting the arms increases back discomfort.Recent knee or hip surgery: Proceed with caution and follow the guidance of your care team regarding weight-bearing positions.If you're working with an injury or a medical condition, check with a qualified professional before practicing.
Related Poses
Table Pose — the natural starting position for stepping into this lunge.Downward-Facing Dog Pose — a common transition into and out of Low Lunge in flow sequences.Upward-Facing Dog Pose — a natural next step for deepening the hip-flexor opening into a full backbend.Bridge Pose — a complementary counter-pose that continues to work hip extension while the spine is supported.Put this pose to use in a full practice: A Gentle Yoga Routine for Tired, Low-Energy Days or find it in A 10-Move Chair Yoga Sequence for a Midday Reset.