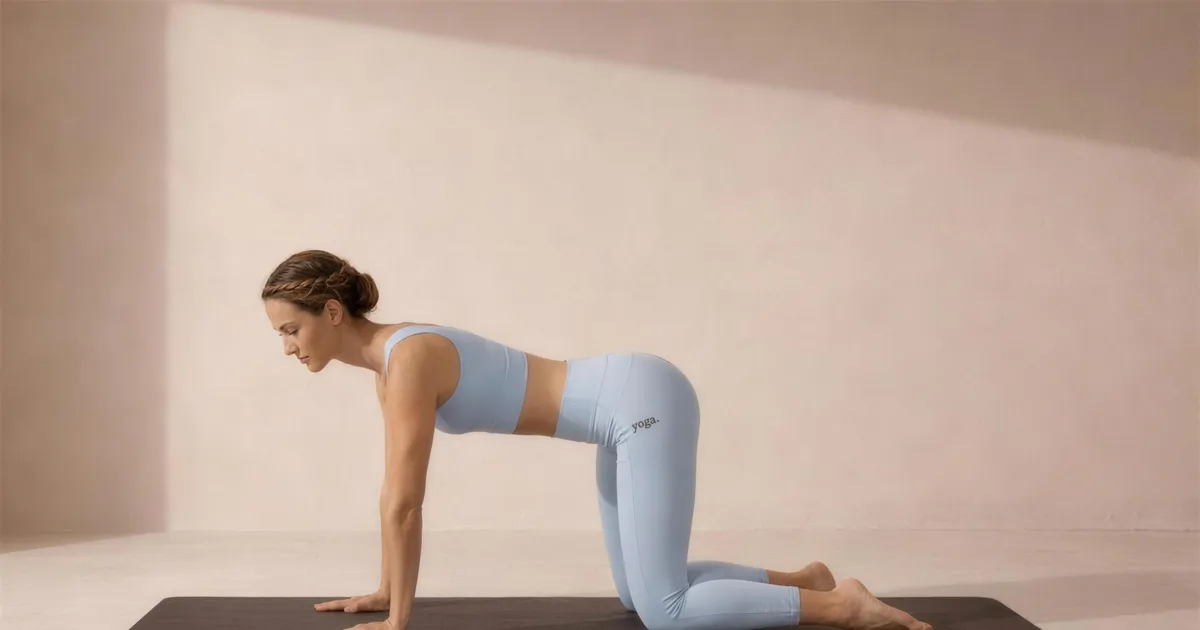
Table Pose (Bhārmanāsana) is a foundational kneeling shape in which your body forms a flat, horizontal plane supported by your hands and knees. It serves as the neutral starting point for Cat and Cow, a rest between stronger backbends, and a building block for arm balances and core work.
At a Glance
- Level: Beginner
- Type: Kneeling
- Targets: Wrists, shoulders, core, spine
- Good for: Establishing neutral spine, building wrist-bearing capacity, developing shoulder stability
How to Do Table Pose
- Begin on your hands and knees on a non-slip mat. Place your knees directly under your hip points, hip-width apart, with the tops of your feet flat on the mat.
- Walk your hands directly under your shoulders, spreading your fingers wide. Press evenly through all four corners of each palm - base of index finger, base of pinky, inner and outer heel of hand.
- Firm your outer upper arms inward and draw your shoulder blades gently down your back so your chest does not collapse between your arms.
- Find a neutral spine: let your lower back curve naturally without exaggerating the arch or rounding it flat. Your pelvis is in a neutral tilt - neither tucked nor tipped.
- Lengthen the crown of your head forward and your tailbone back, so your spine extends long in both directions. Your gaze falls straight down to the mat or slightly forward - chin roughly parallel to the floor.
- Engage your lower belly lightly - think of drawing your navel a few centimeters toward your spine - to support the lumbar curve without gripping your breath.
- Hold for 5-10 steady breaths, checking that your weight distributes evenly across all four points of contact.
- To come out, sit your hips back toward your heels into Child's Pose, or simply lower onto your forearms if you are moving into the next shape.
Benefits
- Strengthens the muscles of the shoulder girdle, building stability in the rotator cuff and serratus anterior.
- Teaches neutral spinal alignment - a skill that transfers directly to standing and seated postures.
- Loads the wrists progressively, conditioning the tendons and joint structures for weight-bearing poses.
- Activates the deep stabilizing muscles of the abdomen and back (transversus abdominis, multifidus) in a low-demand position.
- Provides a clear proprioceptive baseline for understanding how your pelvis, ribs, and head relate to one another.
Common Mistakes and Alignment Cues
- Sinking between the shoulder blades: If your chest drops toward the floor and your upper back rounds passively, press the floor away actively and broaden across your collarbones.
- Overarching the lower back: If your belly drops and your lumbar curves deeply, engage your low belly lightly and lengthen your tailbone toward the back of the room rather than lifting it.
- Hands placed too wide or too narrow: Align your wrists directly under your shoulders - about shoulder-width - so your forearms are vertical when viewed from the front.
- Neck tension or chin jutting: Extend through the crown rather than lifting or dropping the chin; imagine a gentle traction from the top of your head toward the wall in front of you.
- Weight dumped into the heels of the hands: Spread your fingers and press actively through the fingertips to distribute load evenly and reduce wrist compression.
Modifications and Props
- Sensitive wrists: Fold the front edge of your mat under your palms to create a slight ramp, or place a folded blanket under the heels of your hands to reduce wrist extension.
- Tender knees: Slide a folded blanket under your knees to cushion the kneecaps and reduce pressure on the patella.
- Finding neutral spine: Place a yoga block lengthwise along your thoracic spine (from mid-back to the base of your skull) and notice where it contacts - aim for even contact without gaps.
- Core awareness: Rest a block or a folded blanket on your lower back; if it slides off, you may be moving out of neutral. Keeping it steady gives you immediate feedback.
Cautions
- Wrist pain or carpal tunnel concerns: Work with the folded-mat or blanket modification above, and limit time in the pose until wrist strength builds.
- Knee injury or pain: Kneel on a doubled blanket and avoid the pose if any sharp pain arises at the joint.
- Shoulder impingement: Keep your elbows soft (microbend) and be careful not to lock out the joints or let the chest sink.
- Recent wrist surgery or fracture: Avoid weight-bearing on the hands until cleared by your healthcare provider.
If you're working with an injury or a medical condition, check with a qualified professional before practicing.
Related Poses
- Cat Pose - the natural next shape from Table, training spinal flexion
- Cow Pose - the spinal extension complement, practiced in tandem with Cat
- Downward-Facing Dog Pose - a common progression from Table that adds hamstring lengthening and full-body integration
- Hare Pose - a counter-pose to Table that releases the upper back and shoulders
Put Table Pose to work in a full sequence: try A Gentle Yoga Routine for Tired, Low-Energy Days or A 10-Move Chair Yoga Sequence for a Midday Reset.