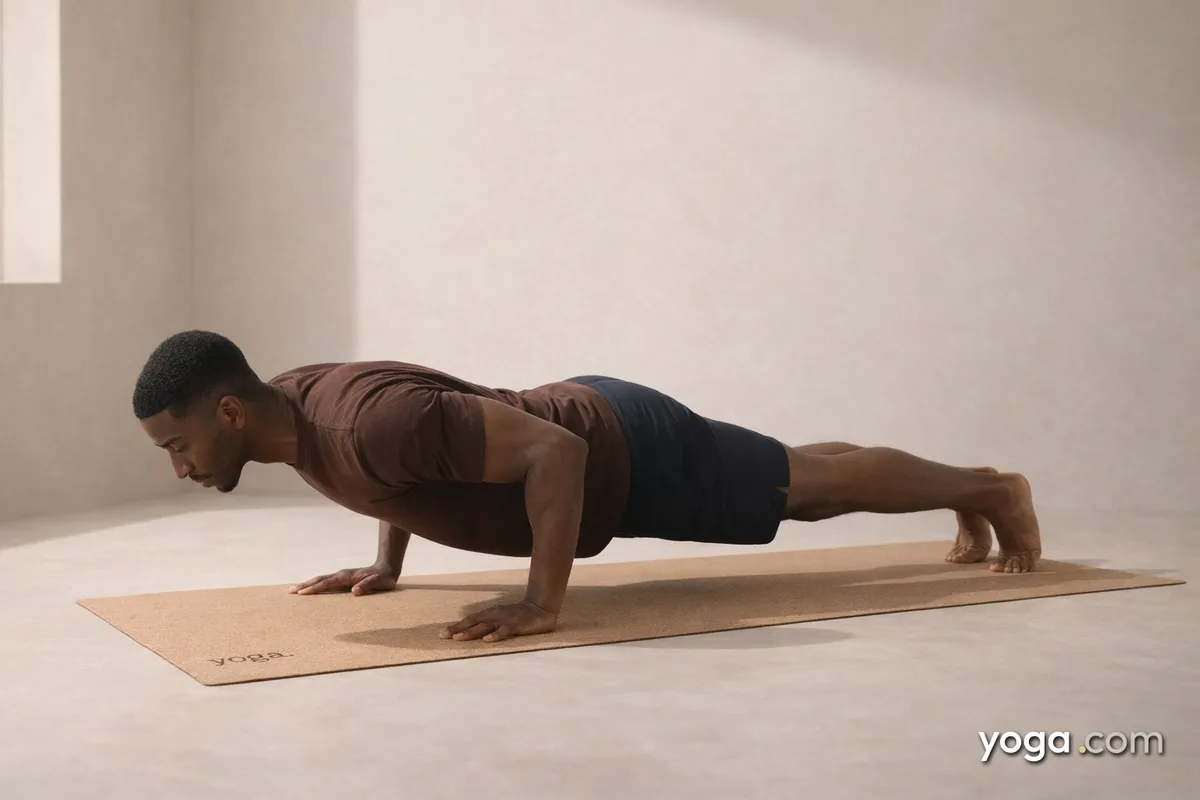
Four-Limbed Staff Pose - Caturaṅga Daṇḍāsana, literally "four-limbed staff" - is a prone arm-balance in which the body forms a single rigid line hovering just above the floor, supported on bent arms and tucked toes. It sits at the core of Sun Salutations and vinyasa transitions, making it one of the most frequently performed poses in a flowing practice. Mastering it precisely builds the strength and body-awareness that every deeper arm-balance demands.
At a Glance
- Level: Intermediate
- Type: Arm-balance
- Targets: Core (transverse abdominis, obliques), chest and anterior shoulders, triceps, wrist flexors
- Good for: Building full-body pressing strength, developing scapular stability, training midline control
How to Do Four-Limbed Staff Pose
- Start in Plank Pose. Stack shoulders directly over wrists, spread fingers wide, press evenly through the base of every finger. Feet are hip-distance apart, toes tucked under. Body forms one straight line from crown to heels.
- Firm the foundation. Grip the mat with your fingertips, rotate the inner elbows forward (toward the top of the mat) to externally rotate the upper arms. This protects the shoulder joint through the full movement.
- Engage the whole body. Draw the lower belly in and up, squeeze the inner thighs toward each other, press back through the heels. Maintain a long, neutral spine - no sagging hips, no lifted seat.
- Lean forward. Shift your weight onto the balls of your feet, tipping the torso forward until the shoulders move slightly past the wrists. This forward lean is essential - without it, the elbows will splay outward as you lower.
- Bend the elbows. Lower the body as a single unit, keeping elbows tracking straight back along the ribs (not flaring to the sides). Stop when the upper arms are parallel to the floor and the elbows form a 90-degree angle. The chest hovers a fist's width above the mat.
- Hold the shape. Gaze forward and slightly down - roughly 6-12 inches in front of your fingertips. Keep the neck long. Every muscle from feet to crown is active. Breathe steadily for 1-5 full breaths.
- Come out safely. Either press back up to Plank Pose (the most common vinyasa exit), or lower all the way to the floor with control before transitioning into Upward-Facing Dog.
Benefits
- Strengthens the triceps, anterior deltoids, and pectorals through an isometric pressing demand
- Builds stability in the serratus anterior and rotator cuff, supporting healthy scapular mechanics
- Develops isometric core strength across the transverse abdominis and obliques
- Trains the deep spinal stabilizers to maintain a neutral spine under load
- Conditions the wrists and forearms for more advanced arm-balances
- Reinforces full-body neuromuscular coordination required in vinyasa transitions
Common Mistakes and Alignment Cues
- Hips sagging below the line of the body. Before you lower, re-engage the lower belly and inner thighs. Think of pressing the floor away rather than just dropping toward it.
- Elbows flaring wide. Hug the upper arms tightly toward the side ribs as you bend. Imagine holding a block between your elbows and your torso.
- Shoulders dipping below the elbows. Stop your descent when the upper arms reach parallel to the floor. Going lower collapses the shoulder joint under load.
- Not shifting weight forward first. If you skip the forward lean in step 4, the hips stay behind the wrists and the elbows are forced outward. Let your chest travel over and past your hands.
- Chin jutting forward. Keep the back of the neck long. The gaze drops slightly - the head does not lead the descent.
Modifications and Props
- Knees down: Lower both knees to the mat before bending the elbows. This shortens the lever arm, significantly reducing the load on the core and shoulders - the most effective starting point for beginners.
- Block under the chest: Place a block at its tallest height under the sternum. Lower until the chest rests on the block, eliminating the risk of collapsing past the safe range of the shoulder joint.
- Block between thighs: Lightly squeeze a block between the upper thighs to activate the inner legs and reinforce midline engagement throughout the hold.
- Wall assist for elbows: Practice with the outer edges of your upper arms brushing against two rolled blankets or the legs of a chair to train elbow-to-ribs tracking before working freestanding.
Cautions
- Wrist discomfort or recent wrist injury: Distribute weight evenly through the entire hand rather than sinking into the heel of the palm. Use a wedge or rolled mat edge under the wrists if needed.
- Shoulder impingement or rotator cuff strain: This pose loads the shoulder in a vulnerable position. Practice the knees-down or block modification and build strength gradually.
- Elbow hyperextension: Maintain a microbend - never lock the elbows in Plank before lowering, as locked elbows increase joint stress during the descent.
- Lower back sensitivity: A sagging lumbar spine places significant compression on the discs. Use the knees-down version until core strength is sufficient to hold the full line. If you're working with an injury or a medical condition, check with a qualified professional before practicing.
Related Poses
- Plank Pose - the direct preparation; build endurance here first
- Upward-Facing Dog Pose - the natural vinyasa counter-pose, extending the spine after the sustained plank shape
- Downward-Facing Dog Pose - use it to reset shoulder and spinal alignment before or after the sequence
- Crane Pose - the next arm-balance progression, requiring the same wrist, core, and shoulder strength developed here
Looking for a well-rounded practice context? See A Gentle Yoga Routine for Tired, Low-Energy Days and A 10-Move Chair Yoga Sequence for a Midday Reset.