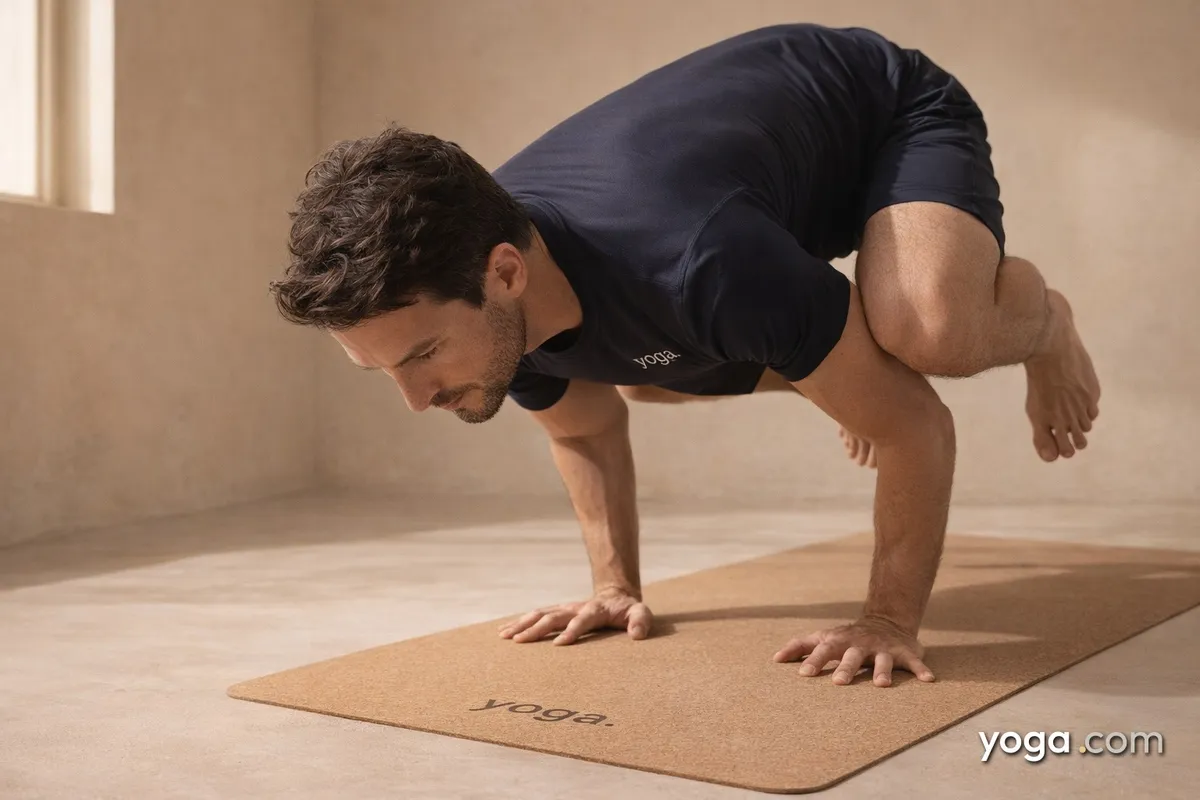
Crane Pose, known in Sanskrit as Bakāsana - from baka, meaning "crane," and āsana, meaning "seat" or "posture" - is one of yoga's foundational arm balances. In it, you support your entire body weight on bent arms while your knees rest on the backs of your upper arms. It typically appears toward the peak of a vinyasa sequence or as a standalone focus in strength-oriented practices.
At a Glance
- Level: Intermediate
- Type: Arm Balance
- Targets: Wrists and forearms, core (transverse abdominis, obliques), hip flexors, upper back
- Good for: Building wrist and shoulder stability, developing core compression, training body-weight coordination
How to Do Crane Pose
- Start in a squat (Malasana). Stand at the top of your mat, feet slightly wider than hip-width apart, and lower into a deep squat with your heels on the floor or on a folded blanket if needed. Press your palms together at your chest and use your elbows to gently nudge your inner knees wide.
- Plant your hands. Place your palms flat on the mat, shoulder-width apart, fingers spread wide and pointing forward. Press evenly through all ten knuckles and the base of each finger - avoid collapsing into the heel of the hand.
- Bend your elbows. Draw your elbows in toward the midline, creating a shelf with your upper arms at roughly a 45-degree angle. Your knees will rest on the outer edges of your upper arms, just above the elbows - this is your platform.
- Shift your weight forward. On an exhale, begin to lean your chest forward over your hands, letting your hips rise and your feet lighten. Look slightly ahead of your fingertips - not straight down - to keep your neck long and your balance point in front of you.
- Lift one foot, then the other. As your weight shifts forward, allow one foot to float off the mat, then bring the other up to meet it. Draw your inner heels toward your seat. Squeeze your knees against your arms and zip your low belly in and up to hold the shape.
- Hold and breathe. Keep your gaze (drishti) soft, a few inches ahead of your hands. Round your upper back slightly - think of pressing the mat away - to activate the serratus anterior and keep your shoulder blades wide. Stay for five to ten steady breaths.
- Come out safely. Exhale and lower your feet quietly back to the mat, returning to your squat. Take a few breaths in the squat before moving on.
Benefits
- Strengthens the muscles of the wrists, forearms, and hands under load
- Builds shoulder stability by activating the serratus anterior and anterior deltoids
- Develops core compression through sustained engagement of the transverse abdominis and hip flexors
- Trains proprioception and body-weight coordination on the hands
- Stretches the upper back and opens the space between the shoulder blades
- Improves hip flexor strength and the ability to draw the legs toward center
Common Mistakes and Alignment Cues
- Mistake: Collapsed wrists with weight in the heel of the hand. Cue: Press firmly through the base of every finger so the center of the palm lifts slightly - this protects the wrist joint and engages the forearms.
- Mistake: Elbows splaying wide. Cue: Actively hug the elbows toward each other throughout the pose; keep them stacked over the wrists as much as possible.
- Mistake: Looking straight down at the mat. Cue: Shift your gaze four to six inches forward of your hands; looking down collapses the chest and tips you backward.
- Mistake: Gripping with the knees but neglecting the core. Cue: The knees on the arms are a ledge, not a crutch - draw the low belly in and up so the legs are held by core compression, not just friction.
- Mistake: Holding the breath. Cue: Keep the breath moving; the exhale naturally activates core compression and helps you stay light in the balance.
Modifications and Props
- Blocks under the feet: Place two yoga blocks at their highest height under your feet in the starting squat. The added elevation makes it easier to shift your center of gravity forward, reducing the effort needed to lift off.
- Block under the forehead (Easy Crow variation): Set a block on its medium height in front of your hands and lightly rest your forehead on it as you lean forward. This removes the fear of tipping and lets you practice the core engagement without the balance demand. See also Easy Crow Pose.
- Feet on the wall: Practice with your back to a wall, walking your feet up the wall into a squat position so your knees can rest on your upper arms. This lets you get the arm and core position right without the lift.
- One foot at a time: Hover one foot and keep the toes of the other foot touching the mat as a spotter. Gradually reduce the contact until you lift both feet.
Cautions
- Wrist pain or injury: Any sharp or pinching sensation in the wrists is a signal to come out. Warm up the wrists thoroughly with circles and gentle extensions before attempting this pose.
- Shoulder instability: If you have a history of shoulder dislocation or impingement, approach this pose gradually and ensure you can comfortably hold Plank Pose for thirty seconds before trying the full balance.
- Recent wrist, elbow, or shoulder surgery: Avoid full weight-bearing on the hands until cleared by your care provider.
- Late pregnancy: Prone and compressed positions that press against the abdomen are generally avoided; skip this pose during the second and third trimesters.
If you're working with an injury or a medical condition, check with a qualified professional before practicing.
Related Poses
- Easy Crow Pose - an accessible entry point that teaches the same arm shelf with less balance demand
- Plank Pose - builds the wrist and shoulder stability required to support body weight on the hands
- Crane Pose with Head on the Mat - a supported variation that isolates the core and arm positioning
- Crane Pose with Both Legs Up - the natural next progression once the standard Bakāsana is steady
Looking to build toward arm balances in a structured sequence? Explore A Gentle Yoga Routine for Tired, Low-Energy Days for a foundational reset, or try A 10-Move Chair Yoga Sequence for a Midday Reset to maintain mobility on busy days.