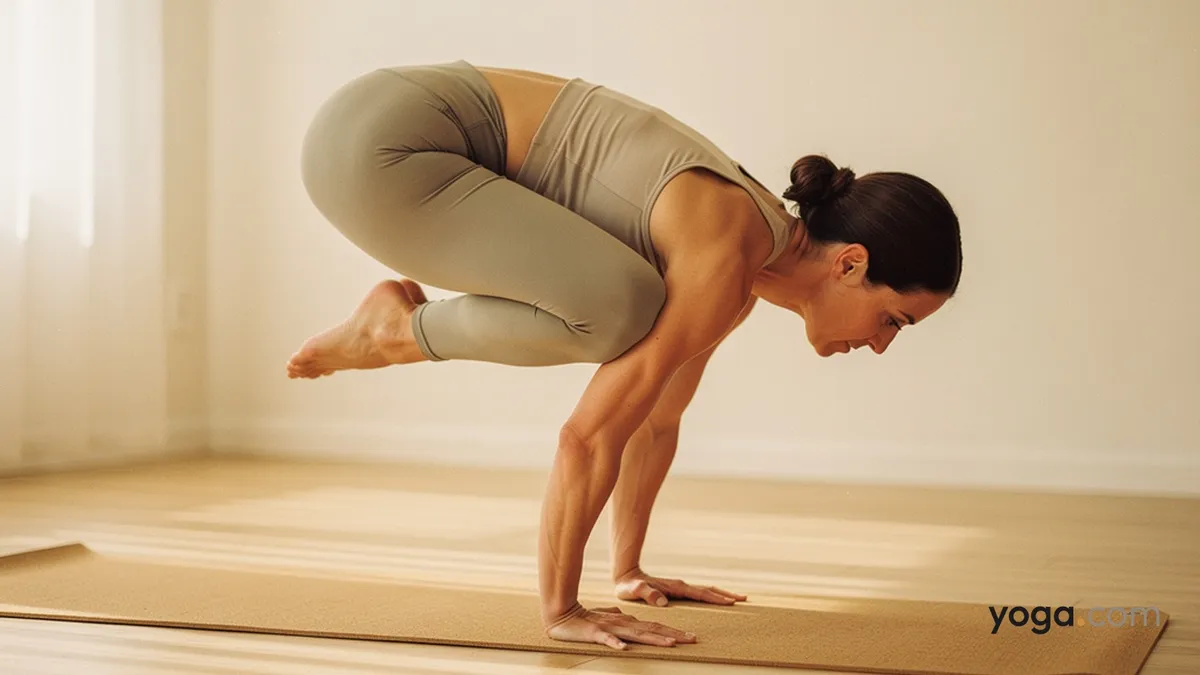
Crane Pose with Half-Bent Legs Up (Bakāsana (half-bent legs up) — from Sanskrit baka, "crane," and āsana, "seat") is an advanced arm balance that asks you to hold your bent knees against your upper arms while your feet lift only partway toward your seat rather than fully extending or fully tucking. This precise mid-range leg position demands more active hip flexor and core engagement than standard Crane, making it both a strength challenge and a study in controlled tension. It typically appears near the peak of a well-warmed arm-balance sequence.
At a Glance
Level: AdvancedType: Arm BalanceTargets: Wrists and forearms, core (transverse abdominis, hip flexors), shoulders, upper backGood for: Building shoulder stability, strengthening wrist-bearing capacity, developing active hip-flexor controlHow to Do Crane Pose with Half-Bent Legs Up
Begin in a squat. From Malasana (garland pose), place your hands shoulder-width apart on the mat, fingers spread wide, index fingers parallel or angled slightly out. Press every knuckle firmly into the floor.Set your shelf. Bend your elbows to roughly 90 degrees, forming a flat upper-arm platform. Draw your knees up and press your inner knees snugly against the backs of your upper arms, just above the elbows.Engage your core before you lift. Pull your low belly in and up, round your upper back slightly (draw belly in as in Uddiyana Bandha), and squeeze your inner thighs against your arms to create a two-way grip.Lean forward. Shift your weight steadily into your hands until your heels begin to rise naturally. Keep your gaze about six inches in front of your fingertips — not straight down.Lift to the half-bent position. Rather than drawing your heels all the way to your seat, stop when your shins are roughly parallel to the floor and your feet are at knee height — legs half-bent, not tucked tight. Hold this position by actively contracting your hip flexors and maintaining a firm upper-back dome.Breathe and hold. Keep the elbows stacked over the wrists (avoid letting them splay wide), press the floor away to stabilize the shoulders, and sustain the lift for three to five full breaths.Come out with control. Exhale, lower your feet back to the mat in a slow, deliberate release rather than dropping suddenly. Return to a squat, then press back to Downward-Facing Dog to decompress the wrists.Benefits
Strengthens the wrist flexors and forearm muscles under sustained loadBuilds shoulder protractor strength and scapular stabilityDevelops active hip flexor engagement through the mid-range of hip flexionTrains deep core activation (transverse abdominis and pelvic floor) in an inverted-weight contextImproves proprioception and body-position awareness in flightCultivates the ability to maintain a stable spinal curve under loadCommon Mistakes and Alignment Cues
Mistake: Elbows splaying outward. Cue: Spin your elbow creases slightly forward so the arms form a contained shelf; this keeps load over the wrist joints.Mistake: Legs creeping fully tucked or fully extended. Cue: Anchor your attention on keeping the shins parallel to the floor — use a mirror or a teacher's eye until you can feel the true mid-bend position.Mistake: Gazing straight down, causing rounding to collapse rather than support. Cue: Find a focal point a hand's length in front of your fingers and keep the crown of the head reaching forward.Mistake: Holding the breath. Cue: Count your exhales aloud — if you can't speak, you're gripping rather than engaging; soften the jaw and breathe.Mistake: Knees sliding off the upper arms mid-hold. Cue: Press your knees into your arms and simultaneously press your arms back into your knees — the isometric squeeze is your anchor.Modifications and Props
Blocks under hands: Place two blocks (medium height) under your palms to increase the height of your platform, giving your feet more clearance and reducing the lean-angle demand on your shoulders.Block under forehead: Rest your forehead lightly on a block while you practice the leg-position and core engagement before committing to the full balance — this takes fear of falling forward out of the equation.Wall at your back: Practice near a wall so your feet can rest against it at the half-bent height while you focus on arm and core engagement without the balance variable.Full Crow as preparation: If the half-bent position feels beyond reach, consolidate full Crow (knees tucked tight) first before gradually extending the legs away from the body to build hip-flexor stamina in stages.Cautions
Wrist pain or injury: This pose places significant compressive load on the wrists; avoid or modify substantially if you have acute wrist inflammation, carpal tunnel symptoms, or a recent sprain.Shoulder instability: Those with rotator-cuff tears or shoulder impingement should approach arm balances only under direct supervision and with a stable baseline of shoulder strength.Pregnancy: Avoid prone and deep forward-weight-bearing positions; this pose is not appropriate during pregnancy.Elbow hyperextension: If your elbows tend to lock into hyperextension, maintain a micro-bend and engage the triceps actively throughout to protect the joint.If you're working with an injury or a medical condition, check with a qualified professional before practicing.
Related Poses
Easy Crow Pose — the logical entry point for building arm-balance confidence before controlling the half-bent leg positionCrane Pose — the straight-leg variation that completes the leg-extension spectrum from this poseCrane Pose with Head on the Mat — a supported variation for practicing the wrist and core load with less balance demandPlank Pose — an essential preparation for building the wrist strength and shoulder stability this balance requiresLooking for ways to integrate arm balances into a broader practice? See A Gentle Yoga Routine for Tired, Low-Energy Days for a recovery-focused counterpoint, or A 10-Move Chair Yoga Sequence for a Midday Reset for an accessible mid-day option.