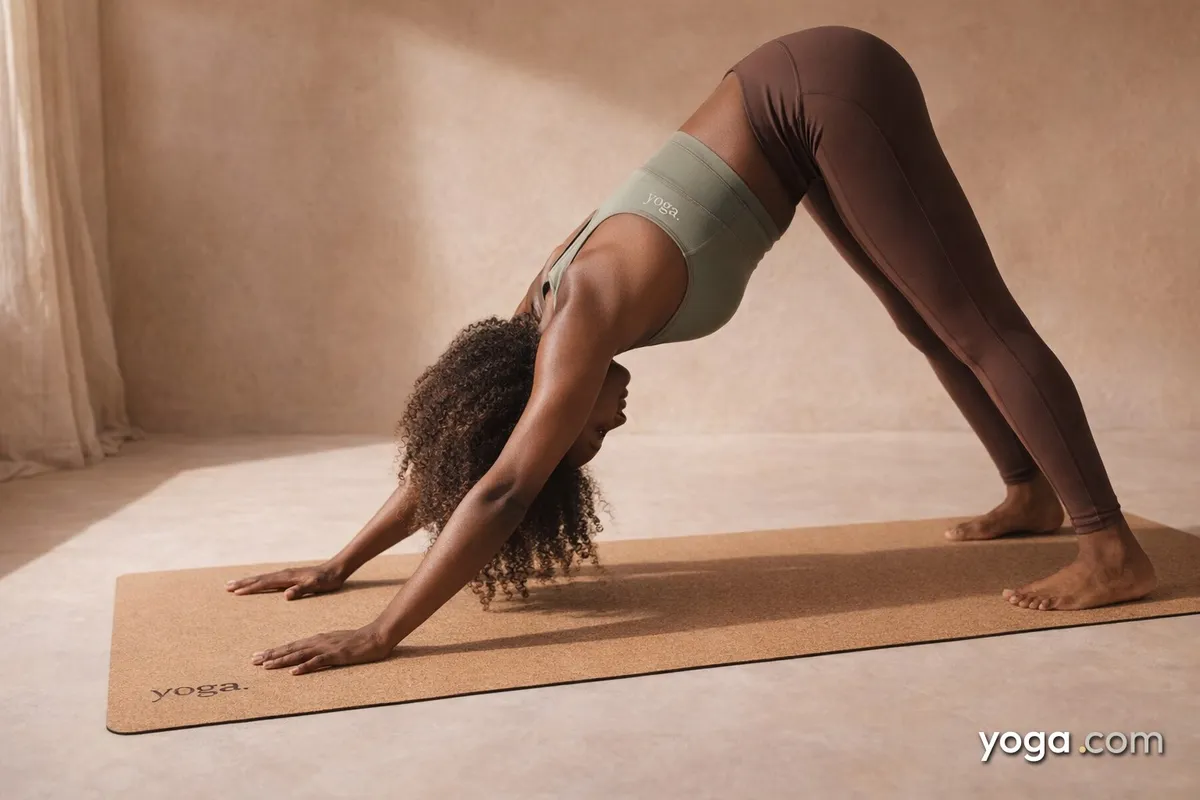
Downward-Facing Dog is one of the most recognized shapes in yoga - an inverted V formed by the whole body pressing away from the floor. Its Sanskrit name, Adho Mukha Śvānāsana, translates literally as "downward-facing dog pose," evoking the full-body stretch a dog makes waking from sleep. It appears as a transition, a resting point, and a pose in its own right across virtually every style of practice.
At a Glance
- Level: Beginner
- Type: Inversion
- Targets: Hamstrings, calves, shoulders, spine
- Good for: Building shoulder and arm stability, lengthening the posterior chain, establishing steady rhythmic breath
How to Do Downward-Facing Dog Pose
- Begin on your hands and knees. Place your wrists directly under your shoulders and your knees directly under your hips. Spread your fingers wide, with your middle fingers pointing straight forward and your weight distributed evenly across the entire palm.
- Tuck your toes under. Inhale to lengthen your spine, then exhale as you press firmly through both hands and lift your hips up and back toward the ceiling.
- Straighten your arms without locking the elbows. Draw your upper arms outward (external rotation) so that the inner elbows face each other and the shoulder blades broaden across your back.
- Lift your sitting bones toward the ceiling and allow your spine to lengthen. Your torso and arms should form one continuous line from hips to hands.
- Work your heels toward the floor - they do not need to touch. Keep a slight, soft bend in your knees if your hamstrings are tight; the priority is a long, neutral spine over straight legs.
- Let your head hang freely between your upper arms, ears in line with your biceps. Your gaze rests toward your navel or between your thighs - do not crane the neck upward.
- Hold for 5-10 breaths, pressing the floor away with each exhale to maintain active length through the spine.
- To come out, exhale and lower your knees back to the floor on an exhale, returning to a tabletop position, or step your feet forward to a Forward Fold.
Benefits
- Stretches the hamstrings, calves, and Achilles tendons through an active load
- Strengthens the muscles of the shoulders, upper back, and arms
- Lengthens the thoracic and lumbar spine against gravity
- Builds stability and proprioception through the wrists and hands
- Encourages diaphragmatic breathing by positioning the torso at an angle that reduces compression on the chest
- Develops body awareness of neutral pelvic tilt and spinal extension - both foundational mechanics carried into many other poses
Common Mistakes and Alignment Cues
- Hands slipping or wrists bearing too much weight: Press actively through the base of each finger and the mound below the index finger, not just the heel of the hand.
- Rounding through the upper back: Rotate your upper arms outward and draw the lower tips of your shoulder blades toward each other to create space across the upper back.
- Forcing straight legs at the cost of a rounded lumbar spine: Bend your knees generously until your pelvis can tilt forward and your lower back lengthens - then gradually work toward straighter legs over time.
- Neck tension from lifting or dropping the head: Keep the head neutral, ears aligned with the upper arms, and release any grip in the jaw and throat.
- Feet too close to the hands: Your stance should be long enough that your spine can extend fully; if your lower back rounds no matter what, step your feet farther back.
Modifications and Props
- Blocks under the hands: Place a block under each hand at the lowest height to reduce the angle at the wrist, making the pose accessible if wrist extension is limited.
- Bent knees: Keep a generous bend in both knees throughout the hold to prioritize spinal length over hamstring range.
- Strap around upper arms: Loop a strap just above the elbows to cue the arms to stay shoulder-width apart and prevent the elbows from splaying out.
- Hands at the wall: Place your hands on a wall at hip height and walk your feet back until your torso is roughly parallel to the floor. This standing variation reduces wrist load entirely and is useful during pregnancy or recovery.
Cautions
- Avoid or modify if you have a wrist injury, carpal tunnel syndrome, or acute wrist pain - use fists, forearms, or the wall variation instead.
- Those with uncontrolled high blood pressure or eye pressure concerns should keep holds brief and transition slowly when coming upright.
- In late pregnancy, widen the feet hip-distance or wider to make room for the abdomen; consult your care provider about inversions as pregnancy progresses.
- If you experience shoulder impingement or a recent rotator cuff injury, keep the range of motion small and avoid pressing aggressively into the end range of overhead flexion.
If you're working with an injury or a medical condition, check with a qualified professional before practicing.
Related Poses
- Downward-Facing Dog Pose with Right Leg Up - extends the shape by lifting one leg, adding hip work and balance challenge.
- Ear Pressure Pose
- Easy Plow Pose
- Plow Pose
Find Downward-Facing Dog woven into a gentle sequence in A Gentle Yoga Routine for Tired, Low-Energy Days, and explore how poses like this one fit into the broader tradition in The History of Yoga: From Ancient Roots to Modern Practice.