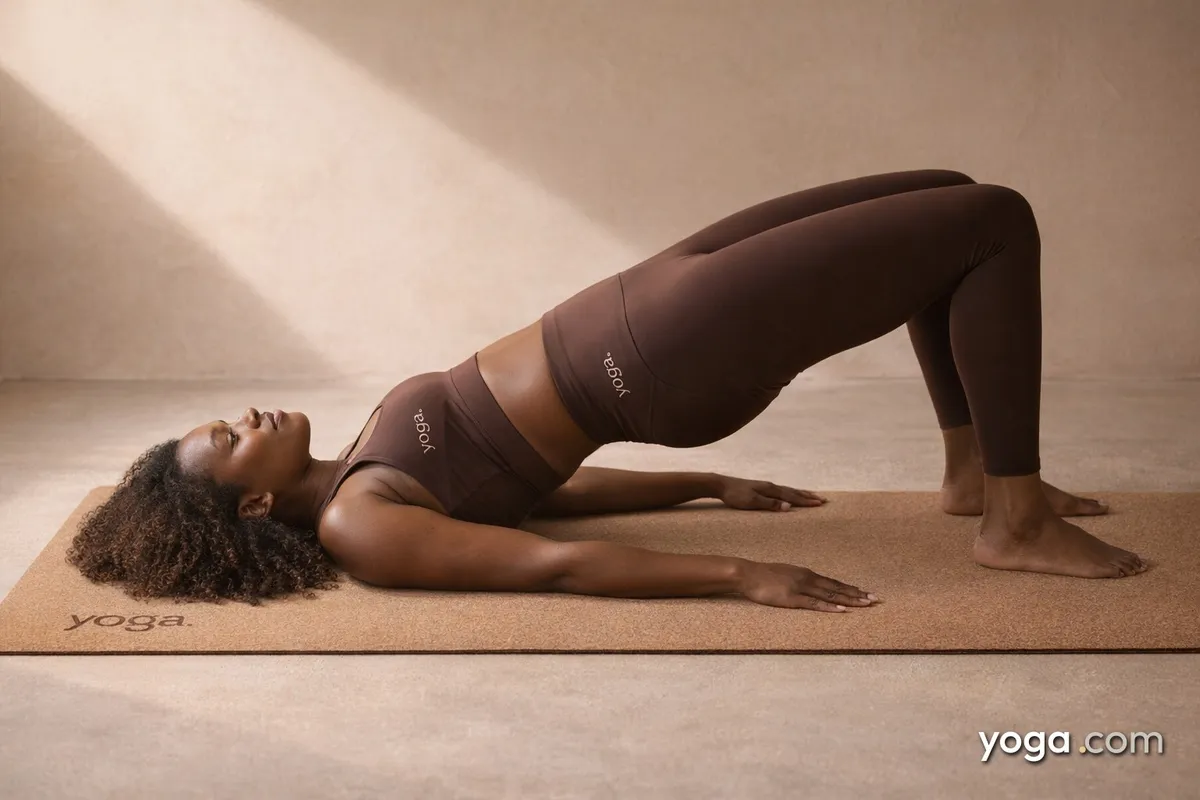
Bridge Pose, known in Sanskrit as Setu Bandha Sarvāṅgāsana - literally "construction of a bridge for the whole body" - is a supine backbend in which your body forms an arched bridge from shoulders to knees. It appears throughout practice as a warm-up for deeper backbends, a standalone heart-opener, or a counter-pose after forward folds. Accessible to beginners yet endlessly refinable, it rewards careful attention to the feet, knees, and spine.
At a Glance
- Level: Beginner
- Type: Backbend
- Targets: Spine, hip flexors, glutes, chest and shoulders
- Good for: Building spinal mobility, strengthening the posterior chain, opening the front of the hips
How to Do Bridge Pose
- Lie on your back with your knees bent, feet flat on the floor hip-width apart. Walk your heels close enough to your sitting bones that your fingertips just graze your heels when your arms are long at your sides.
- Press your arms and palms firmly into the mat. Keep the neck neutral and long on the mat throughout; do not flatten it.
- On an inhale, press evenly through all four corners of both feet and lift your hips off the mat. Lead with the pubic bone rising first to avoid crunching the lower back.
- Engage your inner thighs and keep your knees tracking directly over the second toe - resist the tendency for the knees to splay outward.
- Roll your shoulders one at a time underneath you and, if comfortable, interlace your fingers beneath your hips. Press the outer edges of your upper arms into the mat to broaden across the collarbones.
- Lift your hips until your thighs are roughly parallel to the floor or as high as feels stable. Firm the glutes, but do not grip them so hard that you compress the sacrum.
- Hold for five to ten slow breaths, keeping the breath full and steady into the sides and back of the ribs.
- To come out, release the hands, exhale, and lower the spine one vertebra at a time from the upper back down to the tailbone. Rest with knees together or draw them into your chest for a breath or two.
Benefits
- Stretches the hip flexors, quadriceps, and the anterior chest wall
- Strengthens the glutes, hamstrings, and spinal extensors
- Builds stability in the knee and hip joints by activating the surrounding musculature
- Improves segmental spinal mobility through active extension of the thoracic and lumbar vertebrae
- Engages and tones the muscles of the posterior chain in a supported, low-impact position
- Develops shoulder and upper-back strength when the arms are clasped beneath the torso
Common Mistakes and Alignment Cues
- Knees splaying wide: Place a block between your inner thighs and squeeze it gently throughout the pose to keep the legs parallel and the knees over the second toes.
- Feet turned out: Set your feet parallel - toes pointing straight ahead - so the load distributes evenly across the soles and through the knees.
- Neck flattening or over-pressing into the mat: Leave a small natural gap between your neck and the floor; pressing the cervical spine flat puts undue strain on the vertebrae.
- Hips dropping on one side: Press both feet with equal weight and draw your awareness to leveling the pelvis. Placing your hands on your hip bones can help you feel any tilt.
- Shallow, held breath: Actively breathe into the sides and back of the ribs; a tense chest limits the very opening the pose is meant to create.
Modifications and Props
- Block under the sacrum (Supported Bridge): Lift your hips, slide a block on its lowest or medium height horizontally under your sacrum - the flat, triangular bone at the base of the spine - and let the block carry your weight. This creates a passive, restorative version suitable for tired days or sensitive lower backs.
- Block between the thighs: For students whose knees tend to drift apart, squeezing a foam block between the inner thighs cues proper knee alignment and activates the adductors.
- Strap around the thighs: Loop a strap snugly around both thighs just above the knee. Press out against the strap to feel the hip abductors working - a useful cue if the knees splay even with a block.
- Feet elevated on a chair seat: Rest your calves on the seat of a folding chair with knees bent at roughly ninety degrees, then press into the chair to lift. This reduces the range of motion needed at the ankle and can make the setup more comfortable for students with tight Achilles tendons.
Cautions
- Neck and cervical spine: Never turn your head side to side while the hips are lifted - the compressed upper-back position makes this risky. Gaze stays straight up at the ceiling.
- Knee discomfort: Ensure your feet are hip-width apart and truly parallel. If pain arises in the knee joint (not just muscle fatigue), lower your hips and revisit foot and knee alignment before lifting again.
- Late pregnancy: Supine poses that hold the full weight of the torso flat on the back for extended periods are generally avoided after the first trimester; the supported version (block under sacrum) held briefly may be more appropriate - consult your care provider.
- Recent back or shoulder surgery: Work with a very small range of motion and avoid clasping the hands if there is any shoulder impingement or rotator-cuff sensitivity.
If you're working with an injury or a medical condition, check with a qualified professional before practicing.
Related Poses
- Upward-Facing Dog Pose
- Bow Pose
- Cobra Pose
- Upward Bow Pose - the natural progression once Bridge feels strong and open
Bridge Pose fits well into a slow, supportive sequence - see A Gentle Yoga Routine for Tired, Low-Energy Days for context on how to place it. And if you'd like to understand why backbends have held such a central place across yoga's history, The History of Yoga: From Ancient Roots to Modern Practice offers helpful background.