Bridge Pose on Elbows is a supine backbend that uses the forearms as a stable foundation, allowing the chest and upper back to open while keeping the demand on the lumbar spine gentler than in the full arm-supported version. Its Sanskrit name, Setu Bandha Sarvāṅgāsana (on elbows), translates roughly as "construction of a bridge over the whole body" — here achieved with elbow support. It works well as a preparatory or restorative backbend near the middle or end of a practice.
At a Glance
Level: BeginnerType: BackbendTargets: Chest, thoracic spine, hip flexors, glutesGood for: Building spinal extension, opening the front body, strengthening the posterior chainHow to Do Bridge Pose on Elbows
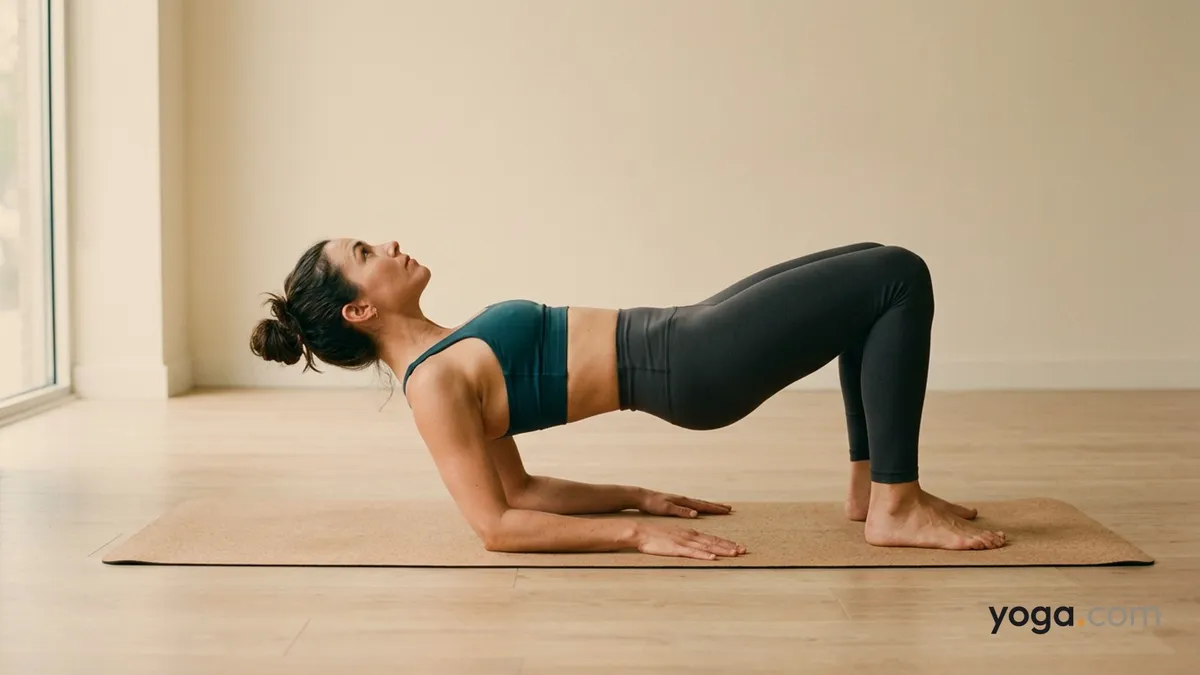
Lie on your back with your knees bent, feet flat on the floor hip-width apart, heels roughly under your knees.Bring your elbows directly under your shoulders and press your forearms firmly into the mat, palms facing down or hands loosely clasped — whichever feels stable.On an inhale, press through your feet and forearms simultaneously, lifting your hips and lower back off the floor.Roll your inner thighs slightly toward each other to keep the knees tracking over the second toe; avoid letting the knees splay wide.Lift the sternum toward the ceiling, allowing the thoracic spine to arc gently. Keep the back of the neck long — your gaze is straight up, not tilted back.Draw the lower belly lightly in and up to support the lumbar spine; avoid gripping so hard that the glutes disengage.Hold for 5–8 breaths, maintaining steady pressure through both forearms and both feet equally.To come out, lower the hips slowly on an exhale, one vertebra at a time, returning the spine to the floor. Rest with knees still bent for a breath or two before moving on.Benefits
Stretches the hip flexors and the front of the thighs as the hips lift into extension.Opens the chest and anterior shoulder girdle, lengthening the pectorals and intercostals.Strengthens the glutes, hamstrings, and spinal extensors as they work to maintain the lifted position.Builds thoracic spine mobility in extension without loading the wrists or shoulders overhead.Engages the deep abdominal stabilizers to protect the lumbar spine in the arched position.Common Mistakes and Alignment Cues
Elbows sliding out wide: Keep the elbows shoulder-width apart and press them actively into the mat throughout the pose — they act as your anchor.Knees falling open: Place a block between your thighs and gently squeeze it to keep the knees aligned and the inner thighs engaged.Chin jutting toward the chest or head tilting back: Lengthen the back of the neck and keep your gaze directed straight at the ceiling.Lumbar compression: Rather than pushing the lower back upward, focus on lifting the sternum and distributing the arch through the mid-back.Feet turned out: Root down through all four corners of each foot and point the toes straight ahead to create even muscular engagement up both legs.Modifications and Props
Block under the sacrum: For a fully passive variation, place a block (low or medium height) under the sacrum after you lift the hips, then release your arms alongside the body. This turns the pose into a supported, restorative shape.Blanket under the elbows: If the forearms or elbows are uncomfortable on a hard floor, fold a blanket under them for cushioning.Block between the thighs: Squeezing a block between the inner thighs helps beginners feel inner-thigh engagement and prevents the knees from spreading.Feet elevated on a chair: Resting the feet on the seat of a chair raises the hips higher with less muscular effort, making the chest opening more accessible if the hip flexors are very tight.Cautions
Avoid this pose if you have an acute neck or cervical spine injury, as the position of the head and the lift of the chest can increase pressure in that region.Proceed carefully with any recent knee injury; if there is discomfort in the bent-knee position, reduce the hold time or place a folded blanket under the knees for support.Those with elbow or forearm injuries should assess whether bearing weight through the forearms is comfortable before lifting the hips.If you are in the second or third trimester of pregnancy, consult your care provider before practicing supine backbends.If you're working with an injury or a medical condition, check with a qualified professional before practicing.Related Poses
Bridge Pose — the standard arm-at-sides version; the natural next step once the elbow variation feels stable.Cobra Pose — a complementary prone backbend that warms the same spinal extensors before you move to supine work.Cat Pose — an excellent counter-pose to cycle spinal flexion against the extension built in Bridge.Upward Bow Pose — the advanced progression for practitioners ready to take the backbend deeper with straight arms.Put this pose to work in a full sequence: A Gentle Yoga Routine for Tired, Low-Energy Days or find a seated complement in A 10-Move Chair Yoga Sequence for a Midday Reset.