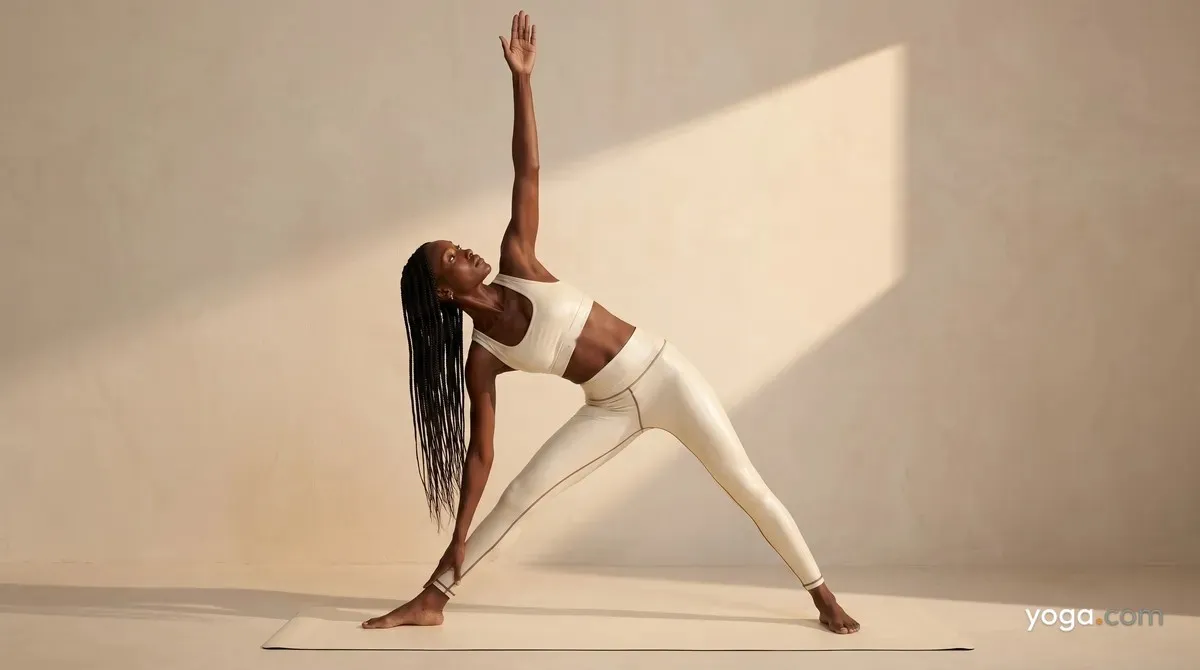
Right Triangle Pose - Trikoṇāsana (right side), from the Sanskrit trikoṇa (three-angle or triangle) and āsana (seat or posture) - is a foundational standing pose that lengthens the entire right side of the body while building stability through both legs. It appears early in most standing sequences, making it an excellent introduction to lateral extension and open-hip alignment. Practiced on the right side first, it establishes the blueprint you'll carry into more demanding standing postures.
At a Glance
- Level: Beginner
- Type: Standing
- Targets: Hamstrings, hip abductors, lateral torso, thoracic spine
- Good for: Lengthening the side body, strengthening the legs, improving spinal lateral mobility
How to Do Right Triangle Pose
- Start in Mountain Pose. Stand tall at the top of your mat, feet together, arms at your sides. Take a breath to ground yourself.
- Step your feet wide. Step or jump your feet approximately 3-4 feet apart. Extend your arms out to the sides at shoulder height, palms facing down.
- Set your foot position. Turn your right foot out 90 degrees so the toes point toward the short edge of the mat. Turn your left foot in about 15 degrees. Align the right heel with the arch of the left foot.
- Engage both legs. Press firmly through all four corners of each foot. Firm your quadriceps, especially the right thigh, and draw the right kneecap up without locking the knee.
- Extend right over the right leg. On an exhale, reach your right arm long out over your right foot - lengthening from the left hip rather than simply dropping. Hinge at the right hip, keeping both sides of the torso long.
- Place your right hand and lift your left arm. Rest your right hand on your shin, ankle, or a block placed outside the right foot. Extend your left arm straight up, palm facing forward, forming one long line from left fingertips to right fingertips. Rotate your chest open toward the ceiling.
- Set your gaze. Turn your head to look up at your left thumb, or keep the gaze forward if that strains the neck.
- Come out carefully. On an inhale, press into your feet and use your core to rise back to standing with arms wide. Turn both feet to parallel, lower your arms, and step back to Mountain Pose.
Benefits
- Stretches the hamstrings and hip abductors of the right leg
- Lengthens the right lateral torso and intercostal muscles
- Strengthens the quadriceps, glutes, and ankle stabilizers of both legs
- Increases thoracic rotation and spinal lateral mobility
- Builds shoulder stability and awareness of the shoulder girdle in an open-arm position
- Develops proprioceptive balance through a wide, stable base
Common Mistakes and Alignment Cues
- Collapsing the torso forward. If the chest rotates toward the floor, think of pressing your back against a narrow wall - stack the hips and reach through the crown of the head to stay in the lateral plane.
- Sinking into the bottom hand. Leaning weight through the right hand compresses the pose. Keep the hand light - it's a guide, not a support - and lengthen actively through the right side of the waist.
- Hyperextending or buckling the right knee. Micro-bend the right knee if you feel the joint snapping back, and lift the kneecap by firming the quadricep.
- Right hip jutting back behind the heel. Draw the right hip forward so both hips stay in the same frontal plane over the feet.
- Neck strain from gazing upward. If looking up creates tension, keep the head neutral with gaze straight ahead - the cervical spine should feel like a natural continuation of the thoracic rotation, not a separate craning.
Modifications and Props
- Block under the right hand. Place a block on its highest height outside the right ankle. This shortens the reach and helps you maintain length in the torso without collapsing.
- Hand on the shin. Resting the right hand lightly on the right shin works well if a block isn't available or the hamstrings are tight.
- Back heel or buttocks against a wall. Stand with the left heel and left hip touching a wall. This provides feedback on alignment and prevents the hips from drifting back.
- Chair variation. Sit sideways in a chair with the right side open. Extend the right arm down toward the floor and the left arm overhead to practice the lateral shape with less demand on the legs.
Cautions
- Low back sensitivity. Keep a gentle engagement in the core and avoid over-reaching downward; shorten your stance if needed.
- Neck issues. Keep the gaze neutral rather than turning the head upward.
- Hip or hamstring injury on the right side. Reduce your range of lateral extension and use a block; do not push through sharp pain.
- Balance concerns or recent ankle injury. Practice with the back heel against a wall until stability improves.
If you're working with an injury or a medical condition, check with a qualified professional before practicing.
Related Poses
- Mountain Pose - grounding preparation and entry point
- Warrior Pose with Right Leg Forward, Left Leg Straight - shares the same wide-legged stance on the right side
- Extended Left Side Angle Pose - a natural counter-pose, mirroring lateral extension on the opposite side
- Downward-Facing Dog Pose - effective counter-pose to re-lengthen the hamstrings and decompress the spine after standing work
See also: A Gentle Yoga Routine for Tired, Low-Energy Days and A 10-Move Chair Yoga Sequence for a Midday Reset.