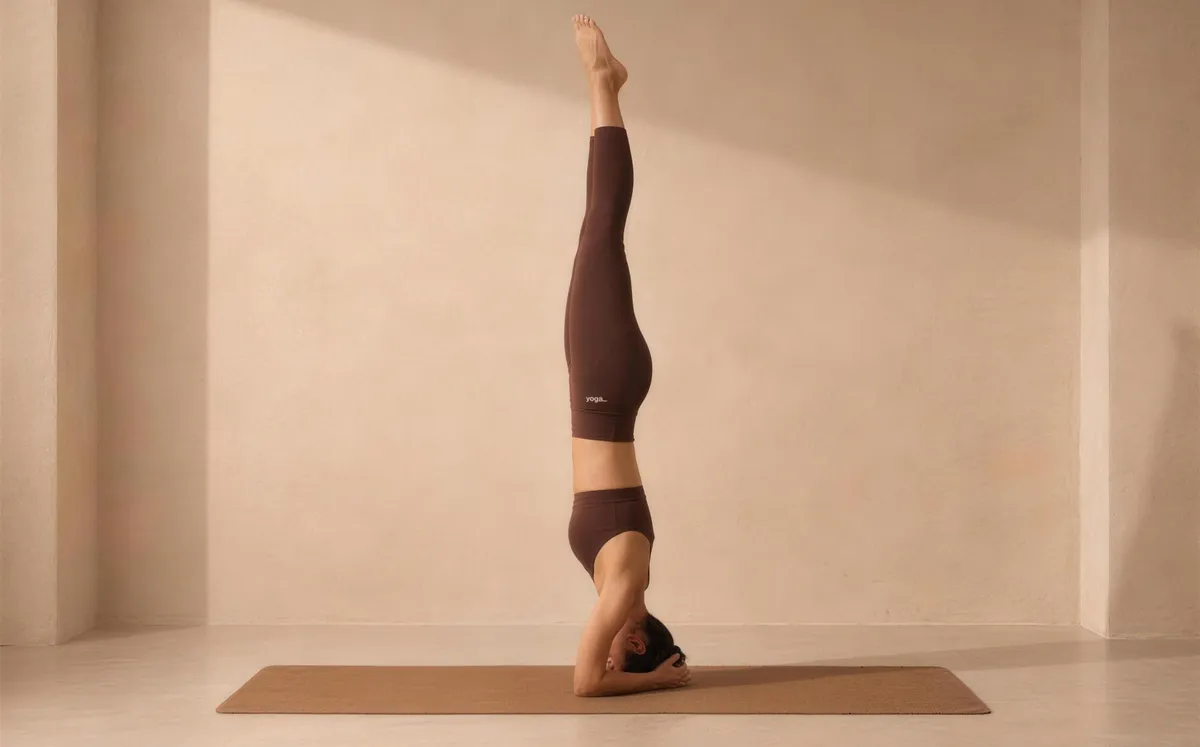
Supported Headstand (Sālamba Śīrṣāsana - literally "supported head standing pose") is the foundational inverted standing posture of the classical Hatha yoga canon. It places the crown of the head and interlaced forearms on the floor to form a stable tripod base, lifting the entire body vertically overhead. Typically sequenced toward the peak of a practice, it asks for genuine shoulder and core strength before the legs ever leave the ground.
At a Glance
- Level: Intermediate
- Type: Inversion
- Targets: Shoulders and upper back, core, cervical and thoracic spine, legs
- Good for: Building full-body balance and proprioception, developing shoulder stability, strengthening deep abdominal engagement
How to Do Supported Headstand
- Set your base. Kneel facing a wall (about an arm's length away). Interlace your fingers loosely and place your forearms on the floor, elbows shoulder-width apart. The outer wrists and little-finger edges press firmly down - this is your tripod foundation.
- Place the crown. Set the very top of your head on the mat so the back of the skull nestles lightly against your cupped palms. Your palms cradle, not grip, the head.
- Walk your feet in. Straighten your knees and walk your feet toward your head until your hips stack over your shoulders and your torso is roughly vertical. Keep lifting the shoulders away from the floor - no weight should collapse onto the neck.
- Draw one knee to the chest. On an exhale, engage your core and float one knee to your chest; pause here if the balance is new. Keep both forearms pressing evenly into the mat.
- Lift both legs. Draw the second knee up to meet the first, both knees tucked. Continue pressing the forearms down and lengthening the spine before straightening your legs toward the ceiling. Inner thighs rotate slightly inward, feet flex or point evenly.
- Hold and breathe. Gaze softly toward the floor at the tip of the nose or between your thumbs. Firm your belly, lengthen through the heels, and keep the shoulders actively lifted so the cervical spine bears minimal load. Start with 5 breaths and extend over weeks of practice.
- Come down with control. Bend your knees to your chest and lower both feet to the floor together - resist the urge to simply drop. Avoid a sudden release.
- Rest in Child's Pose. Stay for at least 5 breaths to allow blood pressure to normalize before raising your head.
Benefits
- Strengthens the shoulder girdle, upper trapezius, and serratus anterior through sustained load-bearing.
- Builds isometric core strength as the deep abdominals work to keep the pelvis neutral against gravity.
- Trains proprioception and vestibular balance, improving whole-body spatial awareness.
- Stretches the posterior neck and upper thoracic muscles in a decompressed, lengthened position.
- Develops leg strength and hip-flexor control required to enter and exit the pose with stability.
Common Mistakes and Alignment Cues
- Mistake: Collapsing weight onto the neck. Cue: Press your forearms into the floor as if you are trying to push the mat away; the crown barely grazes the surface.
- Mistake: Elbows sliding wider than shoulders. Cue: Before you lift, place each elbow at the opposite elbow crease to calibrate shoulder-width, then hold that distance.
- Mistake: Arching the lower back in a banana shape. Cue: Draw your lower ribs in and lengthen your tailbone toward the ceiling - think of stacking hips directly over shoulders over wrists.
- Mistake: Kicking up with momentum. Cue: Practice the tuck-and-lift method: both knees to the chest first, then extend the legs. Momentum bypasses the core control the pose requires.
- Mistake: Holding the breath. Cue: If you cannot maintain an even breath, come down - breath is the clearest signal that you have found your sustainable edge.
Modifications and Props
- Wall support: Practice with your forearms a few inches from the wall so the heels can lightly touch it at the top. This teaches vertical alignment without fear of falling.
- Blanket under the forearms: Fold a firm blanket under your forearms (not under the head) to cushion the elbows and help level the forearm platform.
- Strap around the upper arms: Loop a strap just above the elbows at shoulder width to prevent them from splaying as fatigue sets in.
- Headstand Preparation only: If a full inversion is not accessible yet, practice the forearm base with hips lifted and feet walking in (dolphin position) to build the required shoulder and core strength without inverting fully.
Cautions
- Avoid this pose if you have a current neck injury, cervical disc issue, or shoulder instability - the compressive load is significant even when technique is sound.
- Those with unmanaged high blood pressure, glaucoma, or detached retina should not practice unsupported inversions.
- Do not practice during menstruation if you prefer to avoid inversions in that phase - this is a personal and traditional consideration rather than a universal rule.
- Never come out of the pose abruptly; a sudden drop can spike intracranial pressure and strain the neck.
If you're working with an injury or a medical condition, check with a qualified professional before practicing.
Related Poses
- Headstand Preparation Pose I - build the forearm base and shoulder strength you need before inverting fully.
- Downward-Facing Dog Pose - opens the shoulders and upper back; a natural warm-up for any inversion.
- Plow Pose - a complementary inversion that stretches the posterior spine and serves as a useful counter-pose sequence.
- Corpse Pose - the essential closing posture after any peak inversion practice.
Looking for gentler movement? See A Gentle Yoga Routine for Tired, Low-Energy Days or try A 10-Move Chair Yoga Sequence for a Midday Reset.