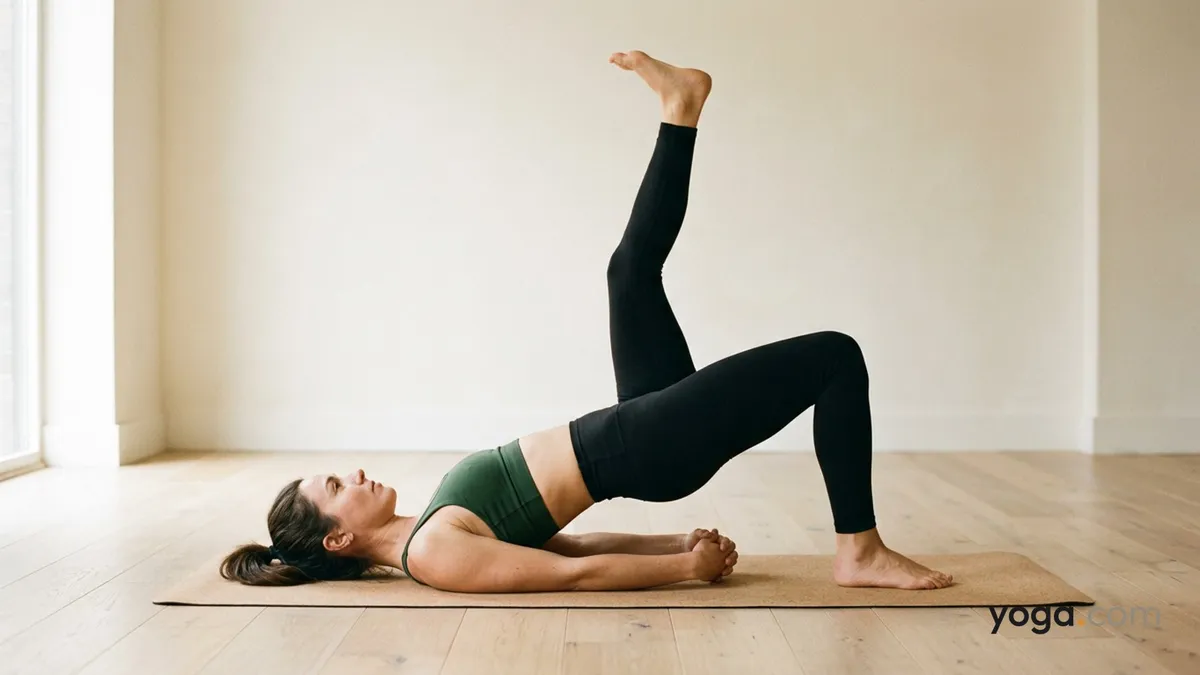
One Leg Bridge Pose (Left) is a single-leg variation of the classic supine backbend, known in Sanskrit as Setu Bandhāsana (one leg, left) — literally "bridge formation pose" — performed here with the left leg extended toward the ceiling. By lifting one leg, you intensify the demand on the grounded foot, the hip extensors, and the spinal erectors, making this a logical intermediate step between the two-legged bridge and fuller backbends such as Wheel. It fits naturally in the peak or cool-down phase of a backbend-focused sequence.
At a Glance
Level: IntermediateType: BackbendTargets: Glutes and hamstrings (right/grounded leg), hamstrings (stretch) and hip flexors (strength) (left/lifted leg), spinal erectors, shoulder girdleGood for: Building single-leg hip stability, strengthening the posterior chain, deepening spinal extensionHow to Do One Leg Bridge Pose (Left)
Set your foundation. Lie on your back with your knees bent, feet flat on the mat hip-width apart, arms resting alongside your torso with palms facing down. Walk your heels close enough that your fingertips just graze them.Root through the right foot. Press all four corners of the right foot firmly into the mat. This is your sole base of support for the full pose, so take a moment to feel even weight across the heel, the ball of the foot, and both outer edges.Lift your hips. On an exhale, engage your glutes and press into the right foot to raise your hips until your thighs and torso form one diagonal line. Optionally clasp your hands beneath your lower back and draw the shoulder blades together to open the chest.Extend the left leg. Inhale. Draw the left knee into your chest first, then extend the left leg straight toward the ceiling, foot flexed or toes pointed, depending on your intention. Keep the left hip level with the right — resist letting it drop.Align and breathe. Check that your right knee tracks directly over the second toe of the right foot and has not splayed outward. Keep your chin slightly away from the chest to maintain length through the back of the neck. Hold for 5–8 steady breaths.Come out with control. Bend the left knee and bring it back to your chest, then lower the left foot to the mat alongside the right. On an exhale, release your hands and lower the hips vertebra by vertebra to the floor.Rest and repeat. Take two full breaths in the starting position before switching sides or transitioning to the next pose.Benefits
Strengthens the gluteus maximus and hamstrings of the grounded (right) leg under increased load.Stretches the hamstrings and calf of the extended (left) leg; hip flexors work to hold it up.Builds unilateral hip stability and trains pelvic control against asymmetrical forces.Strengthens the spinal erectors and encourages thoracic extension.Activates the shoulder girdle and upper-back muscles when the hands are clasped beneath the torso.Common Mistakes and Alignment Cues
Mistake: Hips sinking or rotating when the left leg lifts. Cue: Before you extend the leg, imagine a tray of water balanced on your pelvis — keep it perfectly level throughout.Mistake: Right knee splaying outward. Cue: Press the right big-toe mound into the mat and draw the inner thigh gently inward so the kneecap stays over the second toe.Mistake: Squeezing the glutes so hard the lower back compresses. Cue: Rather than gripping, think of lifting the front hip bones toward the ceiling to lengthen the lumbar spine as you rise.Mistake: Tensing the neck and jaw. Cue: Soften the face, let the back of the skull stay heavy, and keep a finger-width of space between the chin and chest.Mistake: Holding the breath. Cue: Each exhale deepens your lift; each inhale creates length through the spine — keep the breath moving throughout.Modifications and Props
Block under the sacrum: Place a block at its lowest or medium height under the sacrum to support the hips in a passive single-leg bridge. This reduces muscular demand and is useful when learning the pelvic-leveling action.Strap around the lifted foot: Loop a strap around the left foot and hold both ends with the hands. This helps you maintain the leg extension if hamstring tightness causes the knee to bend.Foot on the wall: Place the right foot against the wall at knee height rather than on the floor to create a fixed point of resistance, helping students feel gluteal engagement more clearly.Reduce the range: Keep the left knee bent at 90 degrees, shin parallel to the ceiling, rather than fully extending the leg. This lowers the leverage challenge while still training unilateral balance.Cautions
Neck and cervical spine: Avoid turning your head once the hips are lifted; the neck should remain still and neutral throughout the pose.Lower back sensitivity: If you feel pinching or compression in the lumbar spine during the lift, reduce your height, place a block under the sacrum, or return to the two-legged variation.Knee discomfort: Any sharp sensation in the right (grounded) knee is a signal to check foot placement and alignment before continuing.Shoulder or wrist issues: Keep the arms alongside the body rather than clasping the hands if interlacing the fingers causes discomfort in the shoulders or wrists.If you're working with an injury or a medical condition, check with a qualified professional before practicing.
Related Poses
Bridge Pose — the two-legged foundation to practice before adding the single-leg challengeUpward Bow Pose — the natural next progression for deepening the spinal backbendCamel Pose with Palms Set Against Feet — a complementary kneeling backbend that stretches the hip flexors of both legsCorpse Pose — the ideal counter-pose to neutralize the spine after any backbendFor context in a full practice, see A Gentle Yoga Routine for Tired, Low-Energy Days and A 10-Move Chair Yoga Sequence for a Midday Reset.