Headstand Preparation Pose II (Śīrṣāsana Siddhi II — often translated as "perfection of the head-balance, second variation") is a forearm-and-crown foundation drill that teaches you to load weight correctly through the arms and upper back before any leg lift occurs. It sits naturally in the middle arc of an inversion sequence, after you have steadied the basic tripod frame in Headstand Preparation Pose I and before you attempt a full supported headstand.
At a Glance
Level: IntermediateType: InversionTargets: Cervical and thoracic spine, shoulder girdle and upper trapezius, core (transversus abdominis and obliques), wrists and forearmsGood for: Building shoulder stability, developing axial lengthening awareness, preparing the nervous system for full inversionsHow to Do Headstand Preparation Pose II
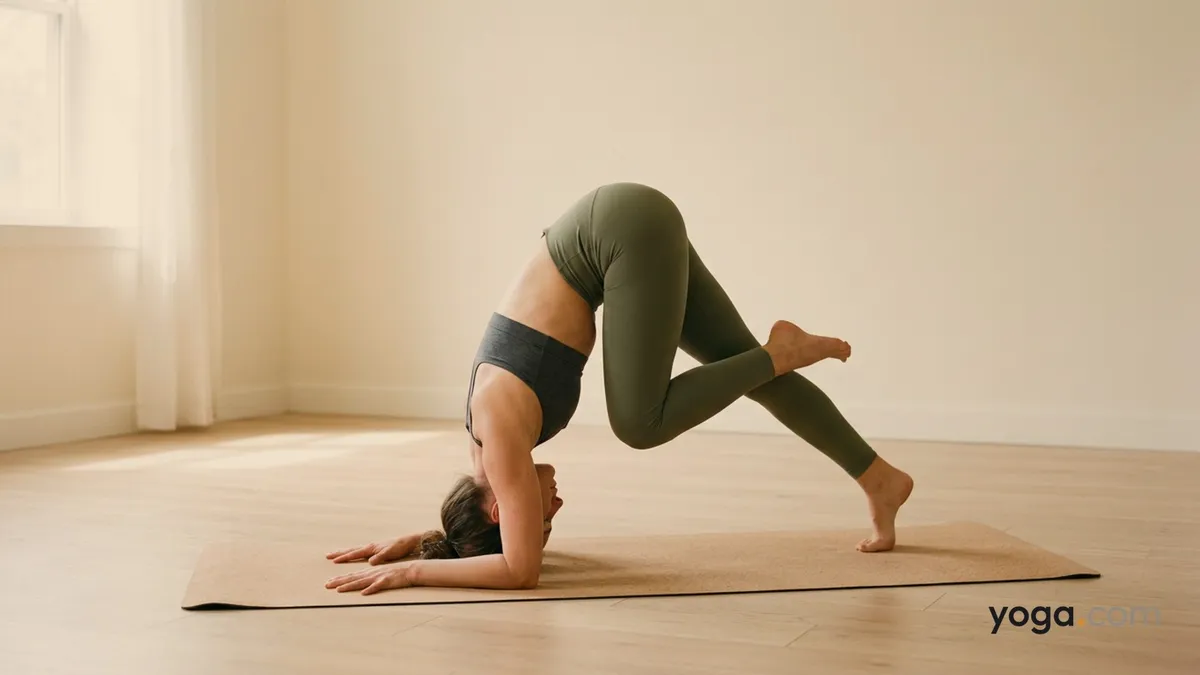
Set your base. Kneel on a folded mat or blanket. Interlace your fingers firmly, tuck the pinky of the bottom hand so both palms cup evenly, and place your forearms on the mat shoulder-width apart, elbows directly below your shoulders.Place the crown of the head. Set the very top of the skull — not the forehead or the back — onto the mat so it nestles lightly against the cupped heels of your hands. Your hands cradle the back of the head without gripping it.Press the forearms down. Before moving your legs anywhere, actively press both forearms into the mat as if you are trying to lift the head off the floor. You should feel the shoulders draw away from your ears and the upper back broaden. This arm-pressing action is the core skill of the pose.Walk the feet in. Straighten your knees and begin walking your feet toward your elbows until your hips stack roughly over your shoulders and your spine is nearly vertical. Keep pressing through the forearms throughout — do not let the head bear the majority of weight.Find your balance point. Pause here with both feet on the floor and your hips high. Breathe steadily for three to five breaths, confirming that the weight is in the forearms and not dumped onto the crown. Your gaze drops softly to a point just beyond your hands.Optional single-leg lift (if appropriate). On an exhale, draw one knee toward the chest, keeping the other foot grounded. Hold for two to three breaths, then switch sides. This is the "II" variation's distinguishing drill — asymmetric loading trains each side of the core independently before any full lift.Come out with care. Lower the lifted knee and walk both feet back out until your knees return to the mat. Release the finger interlock and press up into Child's Pose immediately, rounding the spine gently to decompress the neck. Stay for five breaths before sitting up.Benefits
Strengthens the shoulder depressors (lower trapezius, serratus anterior), building the stability needed to protect the cervical spine in full inversionsTrains the deep core to stabilize the pelvis while the body is partially invertedImproves scapular protraction and upward rotation, key movement patterns for safe overhead workDevelops proprioceptive awareness of head placement and weight distribution on the crownStretches the posterior neck, upper thoracic erectors, and hamstrings as you walk the feet inFamiliarizes the vestibular system with an inverted orientation in a controlled, low-risk positionCommon Mistakes and Alignment Cues
Mistake: Collapsing weight onto the head. Cue: Press the forearms into the floor as though the floor is pushing back. If your arms feel effortless, you are likely loading the neck — reintroduce resistance immediately.Mistake: Elbows sliding wider than shoulders. Cue: Place a block between your upper arms before you lower down; keep gentle pressure on it throughout. Elbows wider than shoulder-width reduces the structural support of the tripod.Mistake: Rounding the upper back excessively. Cue: Without losing the forearm press, think "sternum toward the back of the room" to bring a mild extension into the thoracic spine. The back does not need to be flat, but a collapsed thorax reduces stability.Mistake: Rushing the foot walk-in. Cue: Take one small step at a time and pause between steps. If the hips tilt to one side when you lift a knee, you have walked in too fast — step back until symmetry returns.Mistake: Holding the breath. Cue: Make your exhale audible. A tense diaphragm increases intracranial pressure and reduces balance. Steady breathing also tells your teacher that you are not straining.Modifications and Props
Wall support: Practice one foot away from the wall. When you walk the feet in and lift one knee, the standing foot remains close enough that you can tap the wall if needed. This removes fear of tipping without eliminating the balance challenge.Folded blanket under the crown: A thin, firm-folded blanket under the head reduces pressure on the scalp and helps students who are still calibrating placement of the crown.Block between the hands: For students whose fingers slip or who have wrist discomfort, grip the narrow end of a block rather than interlacing fingers. This also reinforces a neutral wrist position.Bolster under the knees: If knee discomfort prevents a stable starting position, kneel on a bolster. This raises the pelvis slightly and can make the initial forearm-to-mat setup easier to achieve.Cautions
Avoid this pose if you have any acute neck injury, recent cervical surgery, or disc pathology in the cervical spine.Those with high or unmanaged blood pressure, glaucoma, or a detached retina should not practice inversions without specific clearance.During menstruation, some traditions advise against full inversions; make an informed choice that suits your body on that day.If you feel tingling, numbness, or sharp pain anywhere in the head, neck, or arms during the pose, come down immediately via Child's Pose.If you're working with an injury or a medical condition, check with a qualified professional before practicing.
Related Poses
Headstand Preparation Pose I — the direct predecessor; establish the tripod base here firstDownward-Facing Dog Pose — opens the shoulders and hamstrings needed to walk the feet in safelyPlow Pose — a complementary inversion that continues to acclimatize the neck to reversal of the normal spinal loadCorpse Pose — essential counter-pose; practice it for at least five minutes after any inversion work to allow the nervous system to settleFor gentler movement on days when inversions feel like too much, see A Gentle Yoga Routine for Tired, Low-Energy Days. For a quick midday reset that builds body awareness without going upside down, try A 10-Move Chair Yoga Sequence for a Midday Reset.