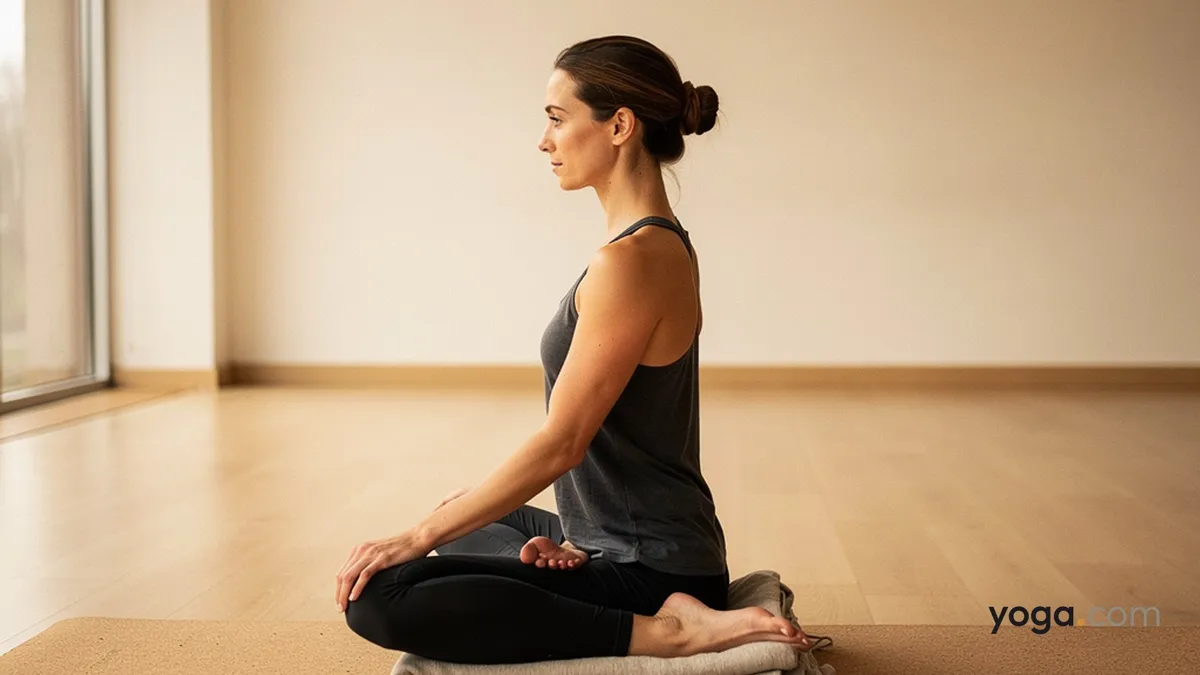
Sukhāsana — from the Sanskrit sukha (ease, comfort) and āsana (seat) — is a simple cross-legged sitting pose that serves as a foundation for pranayama, meditation, and the opening or closing of almost any practice. Despite its name, sitting with a genuinely tall, relaxed spine takes real attention, making this pose both accessible to beginners and worth refining at every level.
At a Glance
Level: BeginnerType: SeatedTargets: Hip flexors, inner groin, spine extensors, anklesGood for: Building upright postural awareness, establishing a steady base for breathwork, cultivating stillness at the start or end of practiceHow to Do Easy Pose
Sit on the floor. If your hips are tight or your lower back rounds, place a folded blanket or a firm block under your sitting bones so your pelvis can tilt slightly forward.Cross your shins so that each foot tucks under the opposite knee. Your knees drop toward — but not necessarily to — the floor. There is a comfortable gap between your heels and your pelvis.Root evenly through both sitting bones. Press the floor away gently to lengthen your spine upward from the base — feel the natural curves of your lumbar and thoracic spine, neither exaggerated nor flattened.Draw your lower belly in and up very lightly, enough to support the lumbar spine without gripping. Lift the crown of your head toward the ceiling.Relax your shoulders away from your ears and broaden across your collarbones. Let your shoulder blades settle onto your back ribs.Rest your hands on your knees or thighs — palms down for a grounding quality, palms up if you prefer an open, receptive feeling. Soften your fingers.Soften your jaw, your tongue, and your gaze. Let your eyes rest at a low, soft angle or close them entirely.To come out, press your palms into the floor beside your hips, lift slightly, and uncross your legs. Extend them forward or move directly into the next pose. When you practice again, alternate which shin crosses in front.Benefits
Stretches the hip flexors, inner groin, and outer ankles over time with consistent practice.Strengthens the erector spinae and deep stabilizing muscles of the spine by asking them to maintain an upright position without back-body support.Trains the postural muscles of the upper back to hold the shoulder girdle in a neutral, open position.Creates a stable, grounded base that allows the breath to move freely through the torso.Establishes a repeatable seated reference point for learning spinal alignment that carries into other poses.Common Mistakes and Alignment Cues
Rounding the lower back: If your pelvis tucks under and your lumbar rounds, sit on more height — a folded blanket, a bolster, or a block — until you can maintain a gentle forward tilt of the pelvis without effort.Collapsing the chest and rounding forward through the mid-back: Imagine a plumb line from your sitting bones through the crown of your head. Lift the sternum without thrusting the ribs forward.Forcing the knees toward the floor: Never press down on your knees. Let gravity do the work over time; any additional pressure risks the inner knee ligaments.Tensing the hands and shoulders: Notice whether you are gripping. Let the weight of your hands rest fully on your thighs, and consciously drop the tops of your shoulders away from your earlobes.Always crossing the same leg in front: Habitually favoring one side creates asymmetrical hip tightness. Alternate which shin is in front each time you sit.Modifications and Props
Sitting on height: A folded blanket, firm bolster, or a block under the sitting bones is the single most effective modification for students whose hips or hamstrings prevent a neutral pelvis on the floor.Support under the knees: If your knees hover far from the floor and cause strain in the inner groin, place rolled blankets or blocks beneath each thigh to give them something to rest on.Seated against a wall: Sit with your back an inch or two from a wall. Without leaning into it, use it as feedback — if you feel the wall between your shoulder blades, work on lifting the chest forward and up.Chair variation: Sit toward the front of a chair with feet flat on the floor, hip-width apart. Apply the same spinal and shoulder cues. This version is equally valid as a meditation seat.Cautions
Knee discomfort: If you feel any sharp pain or pinching in or around the knee joint — not just mild outer-hip stretch — come out immediately and increase the height under your sitting bones or choose the chair variation.Sacroiliac or low-back sensitivity: Asymmetrical hip positioning can aggravate the SI joint. Ensure you are sitting on enough height to maintain a neutral pelvis, and alternate the leg cross each session.Hip replacement: Follow your surgeon's specific range-of-motion restrictions; this pose may require significant modification or avoidance depending on the type of replacement.Sciatica symptoms: Sitting on a flat floor with tight hips can compress the piriformis and surrounding tissue. Use significant height under the pelvis and keep sessions brief at first.If you're working with an injury or a medical condition, check with a qualified professional before practicing.Related Poses
Bound Angle Pose — a preparatory hip opener that increases the range of motion you bring to this seat.Cow Face Pose (Left Leg and Right Arm Up) — a deeper seated hip stretch that follows naturally once the hips have warmed up in Easy Pose.Lotus Pose — the traditional progression from Easy Pose, requiring significantly greater hip external rotation.Corpse Pose — the ideal counter-pose and closing posture after any seated meditation or pranayama session.Easy Pose is also central to A Gentle Yoga Routine for Tired, Low-Energy Days and adapts well within A 10-Move Chair Yoga Sequence for a Midday Reset.