Supported Shoulderstand with Right Leg Behind Head is an advanced inversion that combines the stable base of Sālamba Sarvāṅgāsana — literally "supported all-limbs pose" — with the deep hip and leg-behind-head position of Eka Pāda Śīrṣāsana
At a Glance
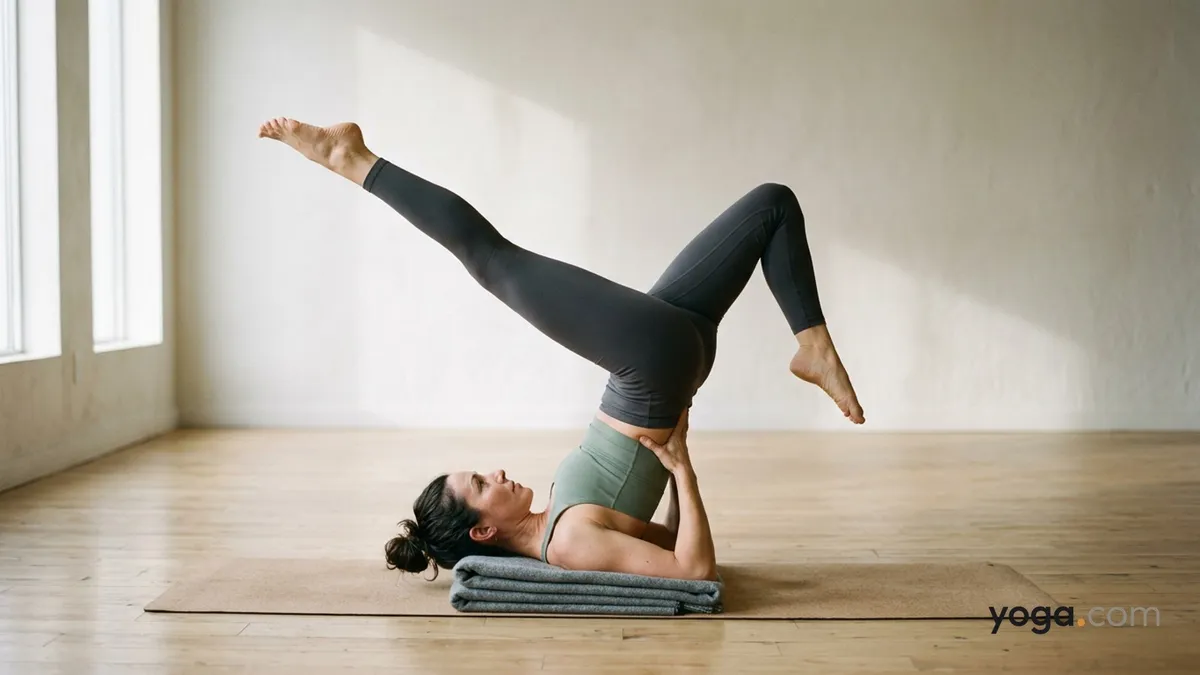
Level: Advanced Type: Inversion Targets: Cervical and thoracic spine, hip flexors and external rotators (right), hamstrings (right), shoulder girdle Good for: Building shoulder and upper-back stability; lengthening the posterior chain of the raised leg; developing asymmetrical hip mobility How to Do Supported Shoulderstand with Right Leg Behind Head Set up Shoulderstand: Lie on your back with a folded blanket under your shoulders so the edge of the blanket aligns with the top of your shoulders and your head rests on the mat. Press your arms alongside your torso. Come into Sarvāṅgāsana: Exhale, swing your legs overhead, and plant your palms on your mid-back, fingers pointing toward the ceiling. Walk your hands up your back to lift the chest toward the chin. Extend both legs straight up, feet together, engaging the inner thighs. Stabilize the foundation: Spread the elbows no wider than shoulder-width. Firm the upper arms into the blanket, broaden across the collarbones, and keep a gentle curve at the back of the neck — the back of the skull is light on the mat. Prepare the right hip: On an exhale, lower the right leg toward your face, bending the knee and externally rotating the right hip. Draw the right knee toward your right ear, then continue to guide the right shin and foot back and down behind your head. Place the right leg behind the head: Hook the right foot behind the skull, resting the back of the right knee or calf on the upper trapezius and shoulder region — never on the cervical spine, which must remain unloaded and gently curved. Keep the left leg fully extended and vertical. The foot is flexed enough to hold the position without gripping. Balance and breathe: Press through the left heel toward the ceiling and maintain even pressure through both upper arms. Gaze softly at the left big toe or toward the ceiling. Hold for 3–8 steady breaths. To exit: Slowly unhook the right leg and return it to vertical alongside the left. Lower both legs to the floor with control — resist letting the lower back collapse. Counter-pose: Come into a supine twist or Corpse Pose for several breaths before continuing. Benefits Strengthens the muscles of the upper back, shoulders, and upper arms that support the inverted torso. Stretches the hamstrings, glutes, and external rotators of the right hip through a large range of motion. Lengthens the cervical and thoracic extensors against the resistance of the inverted position. Trains asymmetrical balance and proprioception in the shoulder girdle. Engages the deep hip flexors and adductors of the standing (left) leg isometrically to maintain vertical alignment. Common Mistakes and Alignment Cues Collapsing the elbows wide: Keep the elbows in line with or slightly narrower than the shoulders — set them before lifting and don't let them drift once you're up. Forcing the leg behind the head by yanking: The leg moves back through hip flexion and external rotation, not leverage. If the foot won't reach, work at the knee-to-ear stage and stop there. Pressing the back of the neck hard into the mat: There should be a small natural curve at the cervical spine. If the neck flattens or compresses, lower out of the pose. Left leg drifting forward: Actively reach the left heel to the ceiling throughout. Use that effort to counterbalance the weight of the right leg drawing back. Holding the breath: The position is intense; slow, even breathing cues you to ease off if you've pushed too far into the hip. Modifications and Props Blanket support: Always practice on two or three folded blankets under the shoulders, regardless of experience. This protects the cervical spine and makes chest-to-chin contact achievable. Wall for the vertical leg: Rest the left foot lightly on a wall while you work on placing the right leg. The wall removes the balance challenge so you can focus on hip mobility. Stay at the preparatory stage: If the right foot does not easily reach behind the head, hold the pose with the right knee bent at the ear — the same hip work is occurring without the full range of motion. Strap around the right foot: Loop a strap around the right foot and hold it with both hands while in Shoulderstand to explore the range of motion before attempting the unassisted version. Cautions Neck and cervical spine: Do not practice this pose if you have a neck injury, disc issue, or recent whiplash. The weight of the body rests on the shoulders and upper back, not the neck, but misalignment under load can be harmful. High blood pressure, glaucoma, or detached retina: Prolonged inversions increase intraocular and intracranial pressure; avoid or keep the hold very short and discuss with a healthcare provider. Hip or sacroiliac joint injury: The extreme external rotation and flexion required to place the leg behind the head can aggravate an unstable SI joint or hip impingement. Menstruation: Many traditions advise against strong inversions during menstruation; listen to your body and make your own informed choice. If you're working with an injury or a medical condition, check with a qualified professional before practicing. Related Poses Plow Pose — a direct preparation that warms the same shoulder foundation and spinal flexion. Ear Pressure Pose — a close progression from Plow that deepens cervical flexion and prepares the neck for Shoulderstand load. Easy Plow Pose — a gentler Plow variation useful for building the shoulder base when full Plow is not yet available. Corpse Pose — the essential counter-pose; take it after exiting to let the nervous system and cervical spine settle. Looking to build a balanced practice around your inversions? See A Gentle Yoga Routine for Tired, Low-Energy Days and A 10-Move Chair Yoga Sequence for a Midday Reset.


