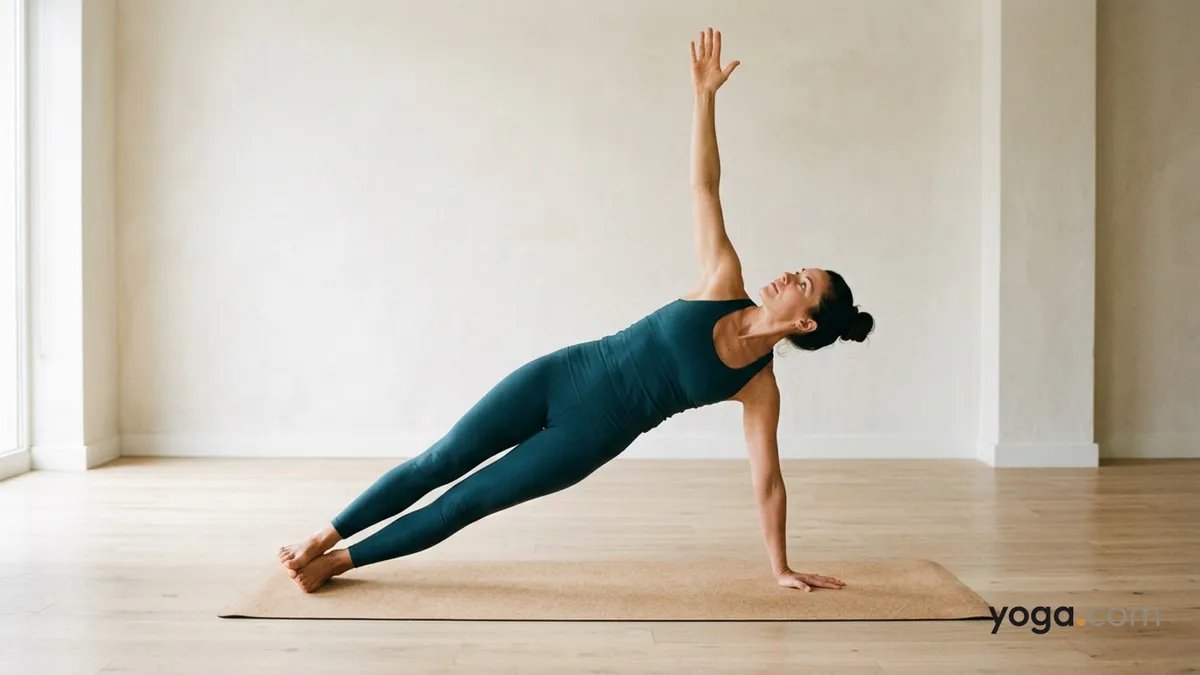
Side Plank Pose on Right Hand with Legs Together is a lateral arm balance that challenges your entire body to form one long, straight line from crown to heels while balanced on the right hand and the outer edge of the right foot. Its Sanskrit name, Vasiṣṭhāsana (right hand, legs together), translates roughly as "the pose of the sage Vasiṣṭha," honoring a revered Vedic seer. It typically appears after Plank Pose in a standing or strength-focused sequence, serving as a test of lateral stability and single-arm bearing capacity.
At a Glance
Level: IntermediateType: Arm BalanceTargets: Core (obliques, transverse abdominis), shoulder girdle, wrist and forearm, hip abductorsGood for: Building lateral core strength, developing shoulder stability, improving full-body alignment awarenessHow to Do Side Plank Pose on Right Hand with Legs Together
Start in Plank Pose. Place your hands directly under your shoulders, fingers spread wide, and press through all ten knuckles. Your body forms one firm plank from head to heels.Shift your weight onto your right hand. Press the right hand firmly into the mat and begin to rotate your torso to the left, rolling onto the outer edge of your right foot.Stack your feet. Bring the left foot on top of the right so both legs are together, inner ankles touching. The outer right foot presses actively into the mat.Lift your hips. Draw your right hip up so your body forms one straight line from head to heels, with your hips lifted in line — the right hand remains on the mat below. Engage your obliques and press your right inner thigh toward the ceiling to keep the hips from sagging.Extend your left arm. Reach the left arm straight up toward the ceiling, fingers together and palm facing forward. Stack the left shoulder directly over the right.Set your gaze. Look forward or, if your neck is comfortable, gaze up toward your left hand.Hold for 3–6 breaths, maintaining steady pressure through the right hand and an active, lifted ribcage throughout.To come out, lower your left hand back to the mat and return to Plank Pose with an exhale. Pause for a breath before practicing the left-side variation or moving to a resting shape.Benefits
Strengthens the obliques, transverse abdominis, and serratus anterior for lateral core stability.Builds load-bearing capacity in the wrist, forearm, and shoulder joint.Engages and tones the gluteus medius and hip abductors of the bottom leg.Stretches the top side of the body — intercostals, obliques, and lateral hip of the left side.Trains whole-body alignment by requiring the spine, hips, and legs to maintain one plane simultaneously.Develops proprioceptive awareness of the shoulder blade against the back ribs (scapular stability).Common Mistakes and Alignment Cues
Hips sinking toward the floor. Press the outer right foot down and lift through the right waist; imagine someone pulling your right hip toward the ceiling with a rope.Right shoulder collapsing inward. Actively push the mat away with your right hand — externally rotate the upper arm so the elbow crease faces forward, not inward.Top hip rotating open or rolling back. Draw the left hip slightly forward so both hip points face the same wall, keeping the body in a single vertical plane.Wrist bent sharply. Spread the fingers wide and distribute weight evenly across the entire palm, pressing firmly through the index finger knuckle to reduce wrist load.Holding the breath. Keep the breath long and steady; if you need to grip, the pose has exceeded your current capacity — modify or shorten the hold.Modifications and Props
Right knee on the mat: Lower the right knee to the floor while keeping the right hip lifted. This shortens the lever arm and reduces the load on the shoulder and core, making the pose accessible while you build strength.Stagger the feet: Instead of stacking the feet, place the left foot in front of the right on the mat ("kickstand" position) for a wider base of support.Block under the right hand: If your wrist is sensitive, place a yoga block at its lowest height under the right hand to reduce wrist extension.Wall support for the top arm: Practice near a wall and rest the fingertips of the top hand lightly against it to improve balance and help you find the correct torso alignment before going freestanding.Cautions
Wrist discomfort or injury: Avoid bearing full weight on the wrist if you have acute wrist pain, carpal tunnel symptoms, or a recent sprain; use the forearm variation instead.Shoulder instability or rotator cuff injury: The supporting shoulder works hard here; skip or modify if you feel sharp or pinching pain in the joint.Elbow hyperextension: If your elbows tend to lock back, keep a very slight bend in the supporting arm to protect the joint.Neck strain: Keep your gaze forward rather than upward if looking up creates tension or pain in the neck.If you're working with an injury or a medical condition, check with a qualified professional before practicing.
Related Poses
Plank Pose — the natural entry point and preparation for this balance.Side Plank Pose on Left Hand, Legs Together — the essential mirror-side companion; always practice both.Downward-Facing Dog Pose — a useful counter-pose to decompress the wrists and relengthen the spine after the lateral hold.Upward-Facing Dog Pose — shares the same demand for strong shoulder protraction and can be sequenced as a dynamic complement.Looking for sequences that build the kind of full-body strength this pose requires? See A Gentle Yoga Routine for Tired, Low-Energy Days and A 10-Move Chair Yoga Sequence for a Midday Reset for accessible options that complement your practice.