Extended Right Hand to Big Toe Pose is a standing balance that asks you to hold your right big toe while extending the leg forward—or, in a more advanced expression, out to the side. Its Sanskrit name, Utthita Hasta Pādāṅguṣṭhāsana (right side), translates literally as "extended hand to big toe pose" (utthita = extended, hasta = hand, pādāṅguṣṭha = big toe). It typically appears in a standing sequence after the body is warm, serving as both a balancing challenge and a focused hamstring lengthener.
At a Glance
Level: IntermediateType: BalanceTargets: Hamstrings, hip flexors, standing-leg ankle and foot, coreGood for: Building single-leg stability, lengthening the posterior chain, developing hip mobilityHow to Do Extended Right Hand to Big Toe Pose
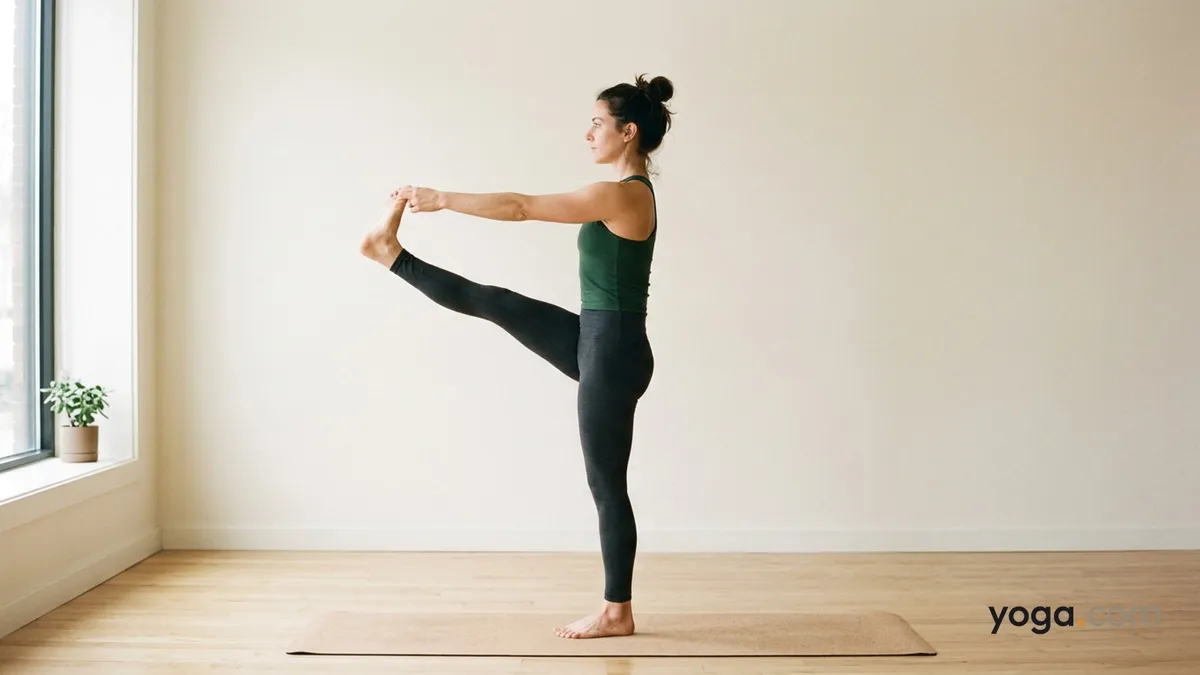
Start in Mountain Pose. Stand with your feet together, arms at your sides, and take a few steady breaths to settle your weight evenly through your left foot.Root through your left foot. Press all four corners of the left foot into the mat. Engage your left quadricep to firm the standing leg without locking the knee.Draw your right knee in. On an inhale, lift your right knee toward your chest. Loop your right index and middle fingers around your right big toe, or clasp the inner arch of your foot.Lengthen your spine. Before extending, sit the tailbone down and lift the crown of the head. Keep your left hip directly over your left ankle rather than shifting to the side.Extend the right leg forward. Slowly straighten the right knee as much as your hamstrings allow—there is no penalty for a soft bend. Press your heel away while keeping your right hip from hiking upward.Set your gaze. Find a fixed point (drishti) at eye level or slightly below. Place your left hand on your left hip or extend it out to the side for counterbalance.Optional: open to the right side. On an exhale, guide the right leg out to the right, keeping both hips level. Turn your head to gaze left to deepen the rotational challenge.Release with control. Bring the right leg back to center, bend the knee, and lower the foot to the mat on an exhale. Return to Mountain Pose and pause before practicing the left side.Benefits
Stretches the hamstrings and calf of the extended legStrengthens the quadricep, hip flexors, and ankle stabilizers of the standing legBuilds neuromuscular coordination and single-leg balanceEngages the deep abdominal muscles to maintain an upright torsoIncreases active hip flexion range of motion over timeDevelops focus and proprioceptive awarenessCommon Mistakes and Alignment Cues
Rounding the back to reach the foot: Keep a long spine rather than collapsing forward—use a strap around the arch so your torso can stay upright.Lifted-leg hip hiking: If the right hip climbs toward the shoulder, draw it down to match the left. Even hips take priority over leg height.Locking or hyperextending the standing knee: Maintain a micro-bend in the left knee to keep the joint safe and the leg muscles active.Letting the gaze wander: Soft or wandering eyes destabilize the pose; fix your focus on one unmoving point before extending the leg.Gripping the toe so tightly the shoulder rides up: Soften the shoulder blade down your back and let the arm work without tension in the neck.Modifications and Props
Strap: Loop a yoga strap around the right foot's arch and hold an end in each hand. This lets you keep a straight spine while the hamstrings gradually lengthen.Wall for balance: Stand with your left shoulder about an arm's length from the wall. Touch your left fingertips to the wall for support as you extend the leg, removing the wall once you feel stable.Bent knee variation: Keep the right knee bent at whatever angle allows you to hold the toe without rounding. Straight legs are the goal, not the starting point.Hip-height variation: Lift the leg only to a comfortable height rather than aiming for parallel to the floor. Working at 45 degrees with a long spine is more effective than a high leg with a collapsed torso.Cautions
Ankle or foot instability: Practice near a wall for the first several sessions; an unstable base can strain the standing-leg ankle.Hamstring strain or tightness: Use a strap and keep the knee soft; forcing the leg straight against tight hamstrings risks muscle or attachment-point injury.Hip or groin issues: Avoid the side-extension variation and keep the leg in the forward position only until the hip has recovered adequate range of motion.Recent lower-back issues: Monitor for any rounding or compression in the lumbar spine; shorten your range and prioritize a neutral pelvis.If you're working with an injury or a medical condition, check with a qualified professional before practicing.
Related Poses
Mountain Pose — the grounding starting point that teaches the alignment you'll carry into the balanceTree Pose on Right Foot — a preparatory balance that builds single-leg stability before adding the hamstring demandAdvanced Extended Left Hand to Big Toe Pose — the natural progression once you're comfortable holding the extended-leg positionStanding Lord of Dance Pose with Right Foot Near the Head — an advanced balance in the same family that deepens hip flexion and spinal extensionFor practice ideas, see A Gentle Yoga Routine for Tired, Low-Energy Days and A 10-Move Chair Yoga Sequence for a Midday Reset.