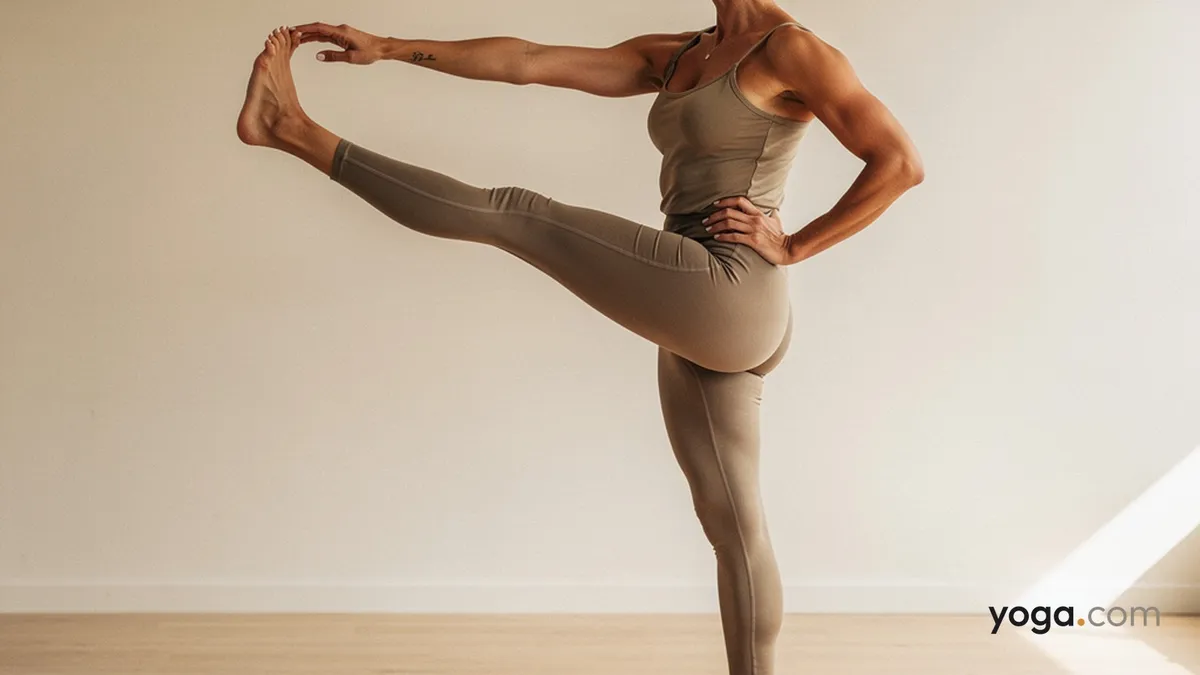
Extended Left Hand to Big Toe Pose is a standing balance that challenges your coordination, hip mobility, and single-leg stability simultaneously. Its Sanskrit name, Utthita Hasta Pādāṅguṣṭhāsana (left side), translates literally as "extended hand to big toe pose" — utthita (extended), hasta (hand), pāda (foot), aṅguṣṭha (big toe). It typically appears mid-sequence after the standing poses have warmed the hips and hamstrings and before deeper single-leg backbends or hip openers.
At a Glance
Level: IntermediateType: BalanceTargets: Hamstrings, hip flexors, standing-leg stabilizers (gluteus medius, ankle musculature), coreGood for: Building single-leg balance, lengthening the posterior chain of the lifted leg, strengthening the hip abductors when extended to the sideHow to Do Extended Left Hand to Big Toe Pose
Start in Mountain Pose. Stand with your feet together, arms at your sides, and distribute your weight evenly through the right foot as you prepare to lift the left leg.Root the right foot. Press down through all four corners of the right foot — big toe mound, little toe mound, inner and outer heel. Engage the right quadriceps and draw the kneecap up slightly without locking the joint.Lift the left knee. Exhale, then on an inhale draw the left knee toward your chest, holding the left shin or the outside of the left foot with both hands. Find your balance here before extending the leg.Take the left big toe. Reach your left arm inside the left leg and hook the left big toe with your left index and middle fingers, thumb pressing over the top. Keep the right hand on your right hip.Extend the left leg forward. On an exhale, begin to straighten the left knee, pressing the heel away from you. Keep your spine tall — resist the urge to round the lower back or hinge forward at the hip. The standing leg remains firm and vertical.Stack the hips. Check that your left hip hasn't lifted toward your left shoulder. Draw it down and back so both hip points stay level. Lengthen through the crown of your head and fix your gaze (drishti) on a still point at eye level.Optional: Open to the left. If your balance and hamstring length allow, on an exhale rotate the left leg out from the hip and guide the left foot to the left side, keeping your torso facing forward. Hold for 3–5 breaths, then return the leg to center before releasing.Come out with control. Bend the left knee, release the toe grip, and lower the left foot to the floor with a slow exhale. Return to Mountain Pose and pause before switching sides.Benefits
Stretches the hamstrings and calf of the lifted leg through active lengtheningStrengthens the gluteus medius and ankle stabilizers of the standing legBuilds hip flexor strength in the lifted leg as it holds the extensionDevelops proprioception and single-leg balance coordinationLengthens the inner groin when the leg is extended to the sideTrains spinal extension under load, reinforcing upright posture habitsCommon Mistakes and Alignment Cues
Mistake: Rounding the lower back to reach the toe. Cue: Use a strap around the left foot so you can hold the strap with a straight arm and keep your spine long rather than collapsing forward.Mistake: Hiking the lifted hip. Cue: Actively draw the left hip crease down; imagine both hip bones sitting on the same horizontal shelf.Mistake: Locking or hyperextending the standing knee. Cue: Microbend the right knee and engage the quadriceps actively — stability, not rigidity.Mistake: Letting the gaze wander. Cue: Pick a single, fixed point at eye level and hold it; shifting eyes destabilizes your balance more than any muscular error.Mistake: Forcing the leg straight before the hamstring is ready. Cue: A slightly bent left knee with a lifted chest is far better alignment than a straight leg with a collapsed spine.Modifications and Props
Strap: Loop a yoga strap around the left foot arch and hold one end in each hand, or hold both ends in the left hand. This allows full spinal extension regardless of hamstring flexibility.Wall for balance: Stand with your right shoulder a few inches from a wall. Touch the wall lightly with your right fingertips as needed to steady yourself while you work on hip and hamstring alignment.Bent-knee variation: Keep the left knee bent at roughly 90 degrees, holding the shin instead of the toe. Focus entirely on standing-leg stability and upright posture before working toward extension.Block under the lifted foot: If you are opening the leg to the side, place a block on a chair or windowsill at hip height and rest the outer left heel on it. This lets you hold the side extension longer without gripping.Cautions
Hamstring strain or recent tear: Avoid active straightening of the lifted leg; work with a strap and a significant bend in the knee until the tissue has recovered.Hip or groin injury: Skip the lateral extension variation and keep the leg lifted forward only, reducing the rotational demand on the hip joint.Ankle instability or recent ankle sprain: Practice close to a wall and avoid holding the full pose for extended periods until the standing ankle is stable.Balance challenges or vertigo: Keep the toes of the lifted foot touching the standing calf (as in Tree Pose) and build from there rather than lifting the leg to hip height.If you're working with an injury or a medical condition, check with a qualified professional before practicing.
Related Poses
Mountain Pose — the foundational standing pose; practice rooting and alignment here before lifting into the balance.Tree Pose (on Right Foot) — a preparatory balance that builds single-leg stability before you add the forward leg extension.Warrior Pose on Left Foot — strengthens the left hip flexors and standing-leg stability in a more grounded context.Advanced Extended Left Hand to Big Toe Pose — the natural next progression once this version is steady and the hamstrings allow full extension.Looking for sequences where this pose fits naturally? See A Gentle Yoga Routine for Tired, Low-Energy Days and A 10-Move Chair Yoga Sequence for a Midday Reset.