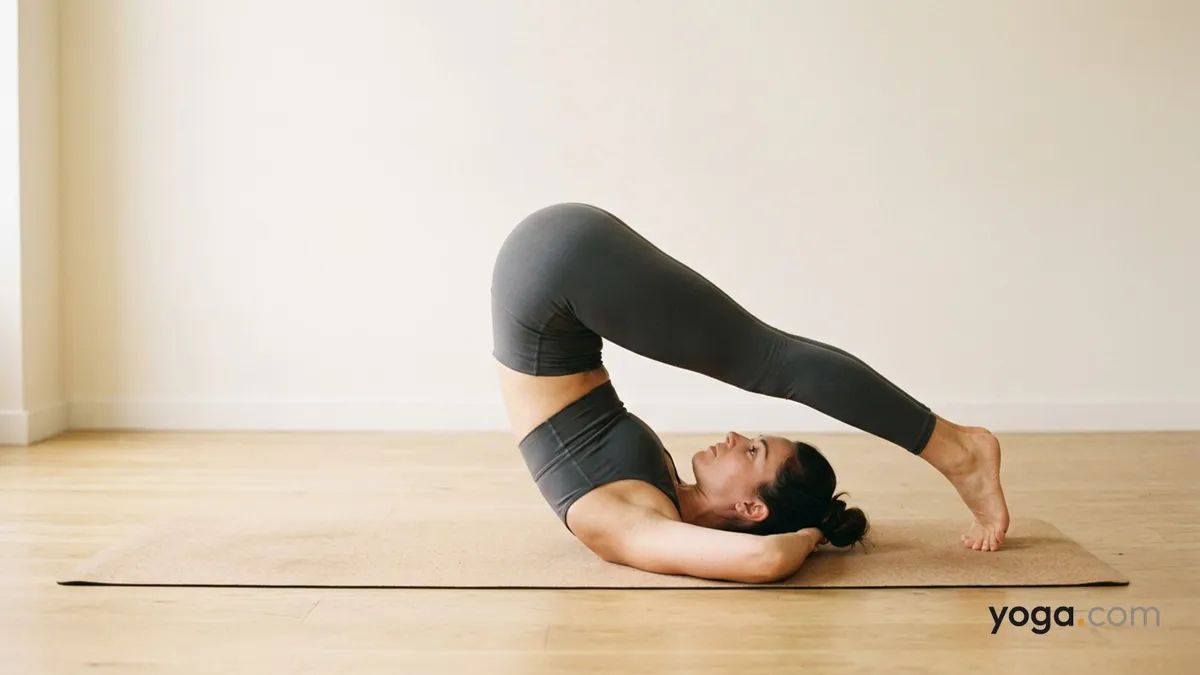
Plow Pose with Hands Under Head — Halāsana (Sanskrit: hala = plow, āsana = seat) — takes the classic plow shape and introduces a softer foundation by cradling the back of the skull in interlaced fingers. That small shift redistributes weight away from the cervical spine, encourages gentle cervical flexion rather than compression, and gives you a stable anchor while the spine lengthens into its full inversion. The result is a pose that feels simultaneously grounded and open.
At a Glance
Level: IntermediateType: InversionTargets: Cervical and thoracic spine (gentle flexion), hamstrings, upper trapezius, rhomboids, posterior shoulder girdleGood for: Spinal mobility, hamstring lengthening, body awareness in inversions, winding down a practiceHow to Do Plow Pose with Hands Under Head
Coming in
Lie flat on your back with knees bent, feet on the floor, arms alongside your body. Take a breath and settle the weight of your skull evenly onto the mat.Interlace your fingers and slide both hands beneath the back of your head — not the neck. Your elbows rest wide on the floor, framing the sides of your head. This hand position stays with you throughout the pose.On an exhale, draw your knees toward your chest and engage your core. Press your elbows and upper arms firmly into the floor to create a stable platform.Inhale to prepare, then exhale as you swing your legs up and over your head, keeping the knees soft if your hamstrings are tight. Let your toes travel toward the floor behind you.If your toes reach the floor, spread them wide and press through the balls of the feet. If they do not reach, remain here — do not force the descent.Actively lengthen the back of your neck: imagine your skull floating gently away from your shoulders. You are aiming for gentle cervical flexion, not compression. A small, natural space remains between your chin and sternum — the chest approaches the chin without pressure.Draw the fronts of your thighs toward the ceiling, engaging the quadriceps so the hamstrings can release passively. Keep both legs parallel and feet hip-width apart or touching.Hold for 5–15 breaths, breathing slowly into the back ribs. Each exhale invites a little more length through the entire spine.Coming out
On an exhale, bend your knees toward your forehead and use your core — not momentum — to slowly lower your hips back to the floor, one vertebra at a time. Keep your hands cradling your head throughout the descent.Once your hips are down, release your hands, extend your legs, and rest in Corpse Pose for several breaths before sitting up.Benefits
Spinal decompression: The inversion reverses the compressive load on the vertebral discs, creating traction through the thoracic and lumbar spine.Hamstring lengthening: Holding the legs parallel and active in full hip flexion provides a sustained, functional stretch through the posterior chain.Upper-back mobility: The rounded thoracic curve actively mobilizes the thoracic extensors, rhomboids, and trapezius through a full range of flexion.Cervical awareness: Cradling the skull trains proprioceptive sensitivity in the neck, helping you distinguish gentle flexion from harmful compression.Calming effect: Many practitioners find this shape calming and use it to transition toward the end of a practice — consistent with the parasympathetic associations commonly attributed to inversions, though individual experience varies.Common Mistakes and Alignment Cues
Jamming the chin to the sternum Keep a finger-width of space between chin and sternum. Think of lengthening the crown of the head away from your tailbone rather than tucking harder. Hands sliding down onto the neck Your fingers support the back of the skull, not the cervical vertebrae. Recheck hand placement before lifting off and again once you are inverted. Rolling onto the tip of the cervical spine The base of the pose rests on the back of the skull and upper trapezius. If you feel sharp pressure on your neck, bend your knees and come down immediately. Letting the legs go slack Passive legs dump weight into the neck. Keep your quads engaged and thighs pressing toward the ceiling — this redistributes load upward through the core. Rushing the exit A fast drop can strain the cervical spine. Slow the descent to a conscious, vertebra-by-vertebra roll-down, using the abdominals to control the movement.
Modifications and Props
Feet don't reach the floor: Place a bolster, folded blankets, or a chair seat behind your head and let your toes rest on the support. This removes any pulling sensation in the neck.Tight hamstrings: Keep a generous bend in the knees so the weight stays distributed across the upper back rather than collapsing into the neck.Shoulder support: Fold two blankets into firm rectangles and place them under your upper arms and shoulders (not the neck) to elevate the platform and reduce cervical angle.Shorter hold: If 5 breaths feels like too much, work with 3 and gradually build over weeks as strength and flexibility develop.Cautions
Avoid this pose if you have a cervical disc injury, unstable neck, glaucoma, or uncontrolled high blood pressure.Do not practice during menstruation if you follow a tradition that advises against inversions at that time.Never turn your head while in the pose — any rotation under load stresses the cervical facet joints.Come out immediately if you feel tingling in your hands, face, or arms, or any sharp sensation in the neck.If you're working with an injury or a medical condition, check with a qualified professional before practicing.Related Poses
Plow Pose — the foundational version; master this before adding the hands-under-head variation.Easy Plow Pose — a gentler entry point with knees bent throughout, ideal for building neck tolerance.Ear Pressure Pose — deepens from plow by drawing the knees toward the ears, the natural next step in this inversion family.Bridge Pose — a preparatory backbend that opens the chest and activates the posterior chain before you invert.