Revolved Side Angle Pose with rotation to the left leg is a standing twist that pairs a deep lunge with a full spinal rotation toward the front (left) knee. Its Sanskrit name, Parivṛtta Pārśvakoṇāsana (rotation to left leg), translates loosely as "revolved lateral angle pose" — parivṛtta meaning "revolved," pārśva meaning "side," and koṇa meaning "angle." It typically appears in the middle of a standing sequence, after the body is warm enough to support both a strong lunge and the demands of axial rotation.
At a Glance
Level: IntermediateType: TwistTargets: Thoracic spine, obliques, hip flexors, outer left hipGood for: Building rotational strength through the trunk, lengthening the hip flexors of the back leg, developing balance and lower-body stabilityHow to Do Revolved Side Angle Pose with Rotation to Left Leg
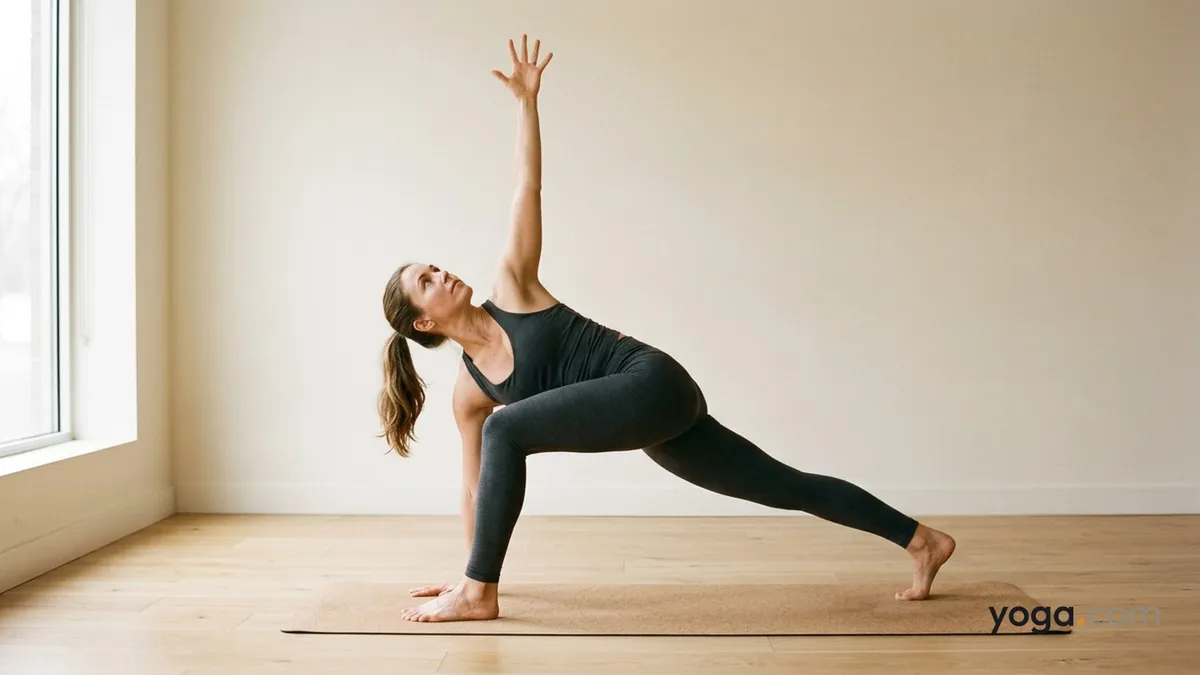
Start in a high lunge, left foot forward. Step your left foot to the top of your mat and lower your right knee to the floor briefly to set your stance, then lift the back knee so both legs are active. Your left knee should stack directly over your left ankle.Square your hips forward. Draw the right hip crease toward the front of the mat so both hips face forward toward the front of the mat. Press the outer edge of your right foot into the floor and firm the back thigh.Bring your hands to prayer at the chest. Inhale to lengthen your spine — grow tall through the crown of your head before you rotate.Exhale and rotate the torso to the left. On your exhale, twist from the mid-back, hooking your right elbow to the outside of your left thigh. Press elbow and thigh against each other to deepen the rotation without forcing it.Extend the arms (full expression). If you have the rotation, lower your right hand to the floor (or a block) on the outside of your left foot, and reach your left arm straight up toward the ceiling, palm facing right. Stack the left shoulder over the right.Set your gaze. Look up past your left hand, or, if you feel compression in the neck, look straight ahead or toward the floor.Hold for 5–8 breaths. With every inhale, lengthen the spine; with every exhale, encourage a little more rotation without collapsing the chest.To come out: Release the twist on an exhale, bring both hands to the floor, and step back to a neutral high lunge or Downward-Facing Dog. Repeat on the other side when you are ready.Benefits
Stretches the hip flexors and quadriceps of the extended right legStrengthens the left glute, quadriceps, and inner thigh in the lunge positionMobilizes the thoracic spine through active rotationEngages the obliques and deep spinal rotators on both sidesBuilds single-leg stability and proprioception through the front (left) foot and ankleLengthens the outer left hip and IT band as the torso crosses the thighCommon Mistakes and Alignment Cues
Mistake: The front knee collapses inward. Cue: Press your right elbow firmly into the outer left thigh and simultaneously push the knee back outward, keeping it tracking over the second toe.Mistake: The back heel lifts or the back leg goes slack. Cue: Root through all five toes of the right foot and keep the back thigh lifted; think of dragging the back foot toward the front without actually moving it.Mistake: The rotation comes from the lower back rather than the thoracic spine. Cue: Keep the pelvis stable and level; initiate the turn from the ribs and mid-back, not from the waist.Mistake: The top shoulder rolls forward, closing the chest. Cue: Rotate the top armpit toward the ceiling and let the chest open perpendicular to the floor.Mistake: Holding the breath through the twist. Cue: Soften the belly; use the exhale to rotate and the inhale to re-lengthen — never lock your breath in this pose.Modifications and Props
Block under the bottom hand: Place a block at its tallest or mid height on the outside of the left foot. This raises the floor, giving you room to rotate fully without collapsing into the shoulder.Back knee down: Lower the right knee to the mat (a blanket underneath is comfortable). This removes the balance demand and lets you focus entirely on the spinal rotation — a smart starting point when learning the twist mechanics.Hands stay in prayer: Keep the palms pressed together at the chest rather than extending the arms. This makes the balance more manageable and keeps the focus on spinal length and rotation.Wall support: Stand a few inches from a wall and lightly touch the fingertips of the top hand to it. This steadies your balance so you can explore the twist without wobbling.Cautions
Spinal disc issues or acute low back pain: Avoid deep twists if you have a herniated disc or are in an acute flare; discuss with a qualified professional before attempting.Knee injury (left knee): Be cautious with the front knee load; avoid forcing the knee past the ankle or torquing it in the twist.High blood pressure or eye/inner ear conditions: Looking upward can increase pressure; keep the gaze level or toward the floor instead.Pregnancy: Deep closed twists that compress the abdomen are generally not appropriate; opt for open-twist variations with guidance from a prenatal specialist.If you're working with an injury or a medical condition, check with a qualified professional before practicing.
Related Poses
Revolved Side Angle Pose with Rotation to Right Leg — the direct mirror pose; practice both sides evenly.Revolved Triangle Pose with Right Arm Behind Left Foot — a straight-leg variation of the same rotational pattern; useful as preparation or progression.Bend to Left Leg with Rotation — introduces rotation toward the left leg with a lower intensity; a good warm-up for the mechanics used here.Downward-Facing Dog Pose — a neutral counterpose to return to between standing twists.For sequences where standing twists fit naturally, see A Gentle Yoga Routine for Tired, Low-Energy Days and A 10-Move Chair Yoga Sequence for a Midday Reset.