Intense Left Stretch Pose, Pārśvottānāsana (left side) — from the Sanskrit pārśva (side), ut (intense), tān (stretch), and āsana (pose) — is a standing single-leg forward bend that brings the torso flush over the left leg. It trains the body to work asymmetrically, exposing and addressing side-to-side differences in hip mobility and hamstring length. Practice it toward the middle of a standing sequence, after the hips and legs are warm.
At a Glance
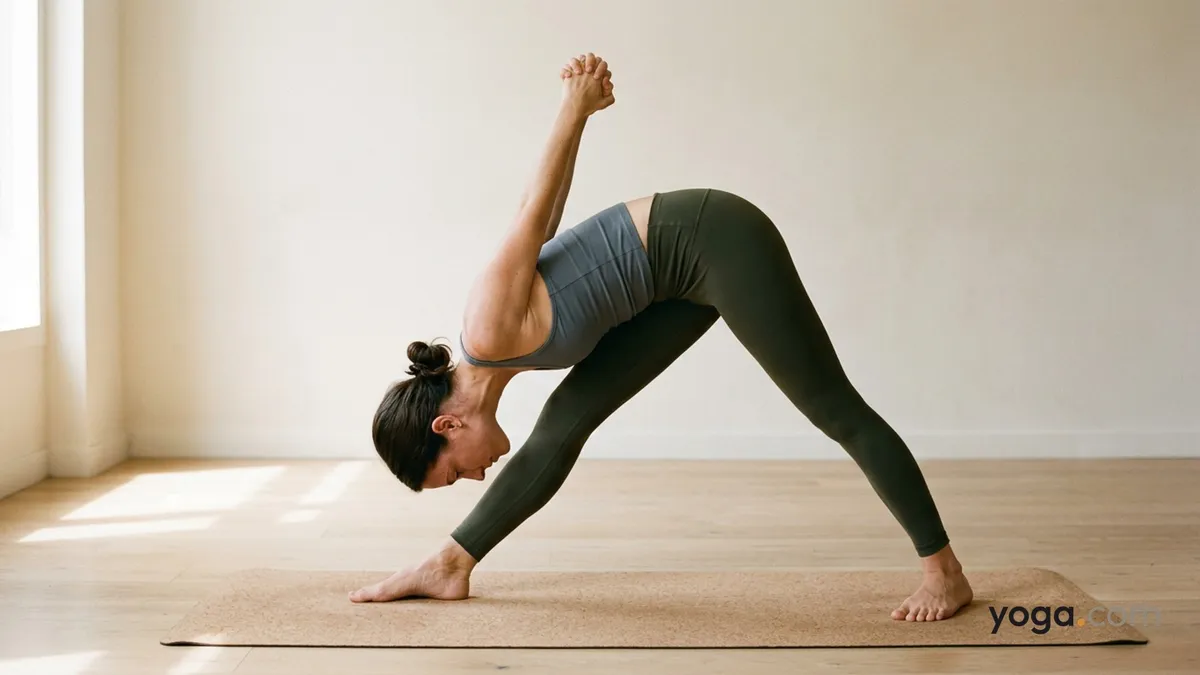
Level: IntermediateType: Forward bendTargets: Left hamstrings, right hip flexors, spine, shoulder girdleGood for: Lengthening the posterior left leg, building single-leg balance, improving spinal axial extensionHow to Do Intense Left Stretch Pose
Set your stance. From Mountain Pose (Tāḍāsana), step your right foot back about 3–3.5 feet. Your left foot points straight forward; your right foot turns out 45–60 degrees. Press all four corners of each foot into the mat.Square the hips. Draw your right hip forward and your left hip back until the pelvis faces the front of the mat squarely over the left leg. This is the non-negotiable foundation of the pose.Position the arms. Extend both arms out to the sides, then sweep them behind your back. Either clasp opposite elbows, interlace the fingers, or bring the palms into reverse prayer (see Modifications). Draw the shoulder blades toward each other.Lengthen before folding. On an inhale, lift the chest and extend the spine long — think of creating space between each vertebra before the fold begins.Hinge at the hips. Exhale and hinge forward from the hip crease (not the waist), keeping the spine extended. Lead with the sternum toward the left shin rather than rounding toward the floor.Complete the fold. Continue hinging until the torso rests along the left thigh. The gaze settles toward the left shin or the floor, neck long. Hold 5–10 breaths, maintaining active legs.Come out with control. On an inhale, press firmly through both feet and rise back to standing with a long spine, leading with the chest rather than the head.Return to center. Step your right foot forward to meet the left, returning to Mountain Pose before switching sides.Benefits
Stretches the hamstrings and calf muscles of the left (front) leg intenselyLengthens the hip flexors of the right (back) legStrengthens the quadriceps and engages the stabilizing muscles of both legsPromotes axial extension of the thoracic and lumbar spineBuilds muscular balance between the left and right sides of the bodyTrains scapular retraction and opens the anterior shoulder line (with hands clasped or in reverse prayer)Common Mistakes and Alignment Cues
Mistake: Hips rotate open. Cue: Before folding, actively draw the left hip back and the right hip forward. Place a hand on each hip to feel them level.Mistake: Rounding the spine to reach the leg. Cue: Prioritize a flat back over depth. Bend the front knee slightly if needed to keep the spine long.Mistake: Front knee hyperextends or collapses inward. Cue: Micro-bend the left knee and press it toward the pinky-toe side of the foot to keep the joint tracking safely.Mistake: Weight shifts into the front heel only. Cue: Ground the ball of the front foot and the outer edge of the back foot equally to maintain stability.Mistake: Craning the neck to look up. Cue: Keep the back of the neck in line with the spine; gaze softly at the shin or floor.Modifications and Props
Blocks under the hands: If the torso doesn't reach the thigh without rounding, place two blocks on either side of the left foot at the appropriate height. This lets you maintain spinal length and hip squareness.Bent front knee: Softening the left knee reduces hamstring intensity enough to allow a genuine hip hinge — a smart entry point for tight hamstrings.Clasped hands instead of reverse prayer: If the wrists or shoulders resist reverse prayer, interlace the fingers behind the back or hold a strap between the hands. Focus on keeping the elbows drawing toward each other.Wall support: Stand about a leg's length from a wall and rest fingertips on the wall as you fold. The wall gives feedback for keeping the torso parallel to the floor while you build hamstring flexibility.Cautions
Hamstring strain or tear: Avoid a deep fold; work with a bent front knee and prioritize a neutral spine over range.Lower back sensitivity: If the lumbar rounds heavily, use blocks and reduce the degree of the fold until spinal extension improves.Wrist, elbow, or shoulder injury: Skip reverse prayer and use the strap or clasp modification instead.Balance challenges: Widen your stance slightly side to side (like standing on railroad tracks rather than a tightrope) for a more stable base.If you're working with an injury or a medical condition, check with a qualified professional before practicing.
Related Poses
Standing Forward Bend — a symmetrical forward bend that prepares the hamstrings and spine for the single-leg versionMountain Pose — the neutral starting point from which you build stance and hip alignmentIntense Left Stretch with Hands Behind Back in Namaste — the traditional arm-bind variation, a direct progression once the fold is accessibleLeft Half Bound Lotus Intense Stretch Pose — an advanced variation adding a half-lotus hip position to the forward foldBuild toward this pose steadily with A Gentle Yoga Routine for Tired, Low-Energy Days, or explore standing balance work in A 10-Move Chair Yoga Sequence for a Midday Reset.