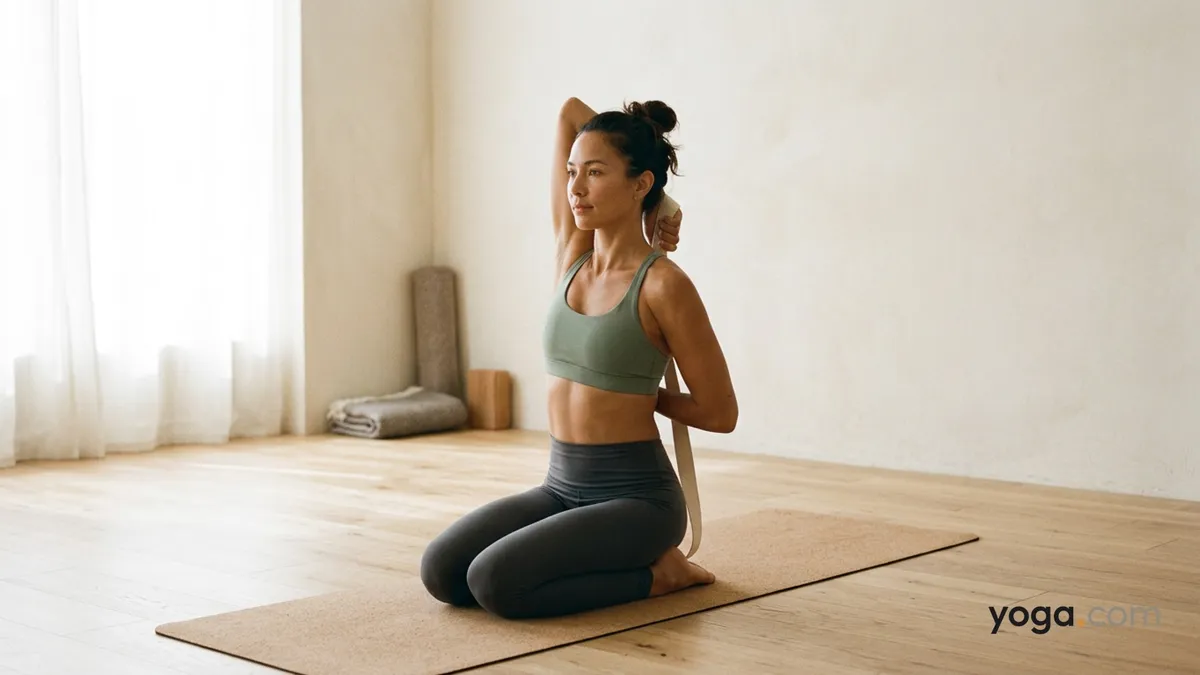
Hero Pose with Upper Left Hand Grab is a kneeling arm-binding variation that layers a rotational shoulder stretch onto the stable foundation of Vīrāsana — "hero's pose" — with the left hand reaching overhead and behind to catch the right hand or wrist at the back. The pose asks the left shoulder to externally rotate in flexion while the right shoulder internally rotates in extension, creating a pronounced asymmetrical opening across the chest and upper back. It fits naturally mid-sequence as a shoulder-preparation or counter-pose to weight-bearing work on the hands.
At a Glance
Level: IntermediateType: KneelingTargets: Shoulder girdle, thoracic spine, hip flexors, quadricepsGood for: Building shoulder range of motion, improving thoracic rotation, cultivating upright spinal awarenessHow to Do Hero Pose with Upper Left Hand Grab
Kneel with your knees together and your feet slightly wider than hip-width. Lower your hips between your feet so you're sitting on the floor (or on a block between your calves). Press the tops of your feet evenly into the mat.Ground your sitting bones, lengthen through the crown, and place both hands on your thighs to establish the baseline of Vīrāsana. Breathe here for two or three cycles until the lower body feels settled.Sweep your left arm straight up toward the ceiling, palm facing inward. Bend the left elbow and lower the left hand down behind your head toward your upper back, fingers pointing down the spine.Bring your right arm out to the right side, then internally rotate it — thumb turning toward the floor — and bend the right elbow to slide the right hand up your back from below, fingers pointing upward.Work the two hands toward each other. If they meet, interlace the fingers or grasp the wrist. If they don't reach, hold a strap between them (see Modifications).Draw your left elbow straight up toward the ceiling rather than letting it drift forward. Keep both shoulders drawing away from your ears. Maintain the natural curves of the spine — avoid collapsing the lumbar or jutting the lower ribs forward.Hold for 5–8 breaths, gazing softly forward or slightly upward.To come out: release the grip, float both arms wide, and lower them to your thighs. Sit quietly for two breaths, then repeat on the opposite side before transitioning out of the kneeling position by coming to hands and knees first.Benefits
Stretches the left shoulder in external rotation and the right shoulder in internal rotation simultaneously, addressing two movement patterns in one posture.Lengthens the triceps and the posterior capsule of the upper left shoulder.Strengthens the deep stabilizers of the scapula, particularly the lower trapezius and serratus anterior on the lifted-arm side.Mobilizes the thoracic spine into mild extension and lateral elongation.Stretches the quadriceps and hip flexors through the sustained kneeling position.Encourages an upright axial posture by requiring the spine to stay tall against the asymmetrical pull of the arm bind.Common Mistakes and Alignment Cues
Left elbow drifts forward in front of the ear. Cue: Press the back of the upper left arm gently against an imaginary wall behind you to draw the elbow directly overhead.Lower ribs flare as the left arm reaches up. Cue: Exhale and knit the front ribs together before initiating the bind; keep that softness throughout.Hips lift off the support surface. Cue: Root the sitting bones down first; if hips float, raise the seat height with a block before adding the arm work.Forcing the hands to clasp, compressing the cervical spine. Cue: Use a strap and prioritize the position of the left elbow over closing the gap — the shoulder work happens regardless of whether the hands touch.Holding the breath to "get there." Cue: If you can't keep the breath fluid, back off the grip until the effort is sustainable.Modifications and Props
Yoga strap: Hold a looped or folded strap between the two hands so you can maintain correct elbow position without straining. Gradually walk the hands closer on the strap over time.Block under the sitting bones: If the knees, ankles, or shins protest the full kneeling seat, place one or two stacked blocks between the feet to elevate the hips and reduce joint compression.Folded blanket under the shins: Roll a blanket under the ankles and shins for padding if the tops of the feet are tender against the mat.Wall support for the upper arm: Practice with the back of the upper left arm resting lightly against a wall — this provides proprioceptive feedback to keep the elbow from wandering forward.Cautions
Knee discomfort or injury: The kneeling base places sustained load on the knee joint; skip or modify with significant elevation if you feel pinching or sharp sensation.Ankle or shin sensitivity: Use padding under the feet and shins, or explore the arm work seated in a chair instead.Shoulder impingement or recent shoulder surgery: Avoid pressing into end-range if you feel clicking, pinching, or pain in either shoulder; work only within a comfortable, pain-free range.Neck issues: Keep the cervical spine neutral; do not crank the head back or sideways to compensate for a tight shoulder.If you're working with an injury or a medical condition, check with a qualified professional before practicing.
Related Poses
Hero Pose with Hands on Thighs — the direct foundation; establish a comfortable kneeling seat here first.Diamond Pose — a closely related kneeling shape that reinforces the same lower-body base.Downward-Facing Dog Pose — an effective counter-pose that decompresses the shoulders and wrists after binding work.Bridge Pose — a useful follow-up that moves the shoulder girdle into a different plane and continues thoracic mobility work.For gentle sequences where this pose fits well, see A Gentle Yoga Routine for Tired, Low-Energy Days and A 10-Move Chair Yoga Sequence for a Midday Reset.